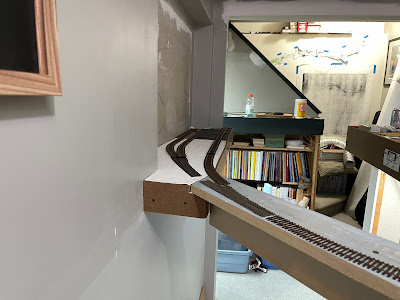
I have a few things to complete in terms of trackwork on the layout.
Bulk Tracks
With the swing bridge in place, I need to install the bulk tracks. This is Microengineering Code 55 track, and I really should have used it a lot more on the layout.
This looks like it will be a good fit. The ME turnouts will be Code 70, and all the track 55. I don't know if that's prototypical for this specific application, but it's not unheard of for switches to be heavier rail.
As you can see there is a pair of bulk tracks, plus a third track that represents the track to Stanley Rule & Level across Whiting St. There will be a concrete unloading ramp and a crane as well.
Turnout to Track No. 5
The second thing I started mocking up is the turnout from Track No. 1 to Track No. 5 at East Main St. I picked up a No. 10 Central Valley Model Works tie strip to test, so I can order some supplies from Proto:87 Stores. I had originally used a Walthers turnout in this location, but I wanted to replace it with something that was a better match for the rest of the trackwork. Central Valley Model Works tie strips are a near perfect match for Microengineering flex track.
I first filled the space with a piece of flex track and marked a piece of paper with graphite to get the location of the railheads, particularly the entrance and exit of the main track.
I cut this section out just outside of the rail to use as a template. I tape this to a piece of homasote as a guide.
Because this will be a curved turnout, I cut the webbing between the ties on the outside of the tie strip, then tape it in place over the template.
The fit won't match the curve exactly because like the prototype I maintain straight sections through the points and the frog. This is on a section that is nominally 24" radius, so I use a piece of 24" sectional track as a check to make sure I am not making any curved portion tighter than that radius.
When satisfied with the geometry, I thoroughly tape down the entire tie strip. You have to do this on the outside of the ties, because we'll be using the molded on tie plate as a jig to keep everything in gauge.
Using push pins, I test fit a piece of rail to the outer curve and it looks good.
Time to order some parts, and I'll come back to show my entire process when they arrive.


No comments:
Post a Comment