So one of the things I'm notorious for is not finishing projects. At least in a timely manner. The process of building the shanty so far has taken me two days to the end of Part III. These posts are also written well ahead of the time they are scheduled to be posted on the site, since I can write a bunch of posts at one time.
My intention was to complete this model fully, painted and weathered. When I finished the Part III process, I needed some supplies. When picking up the strip styrene, I tripped in the dark parking lot, and thought I had broken my leg/ankle. It turned out to be a very bad sprain. Since stairs are tough, I wrote out these posts the next day, which aren't being published on the blog for a few weeks. Thus giving me time to finish the build process and finish Part IV. So here we go!
The techniques for the rest of the build are basically the same.
The railings are made from 2"x4" strip styrene. In the pictures, the only support I can make out is the one diagonal brace. I may add a second to the other side, but I can't see any legs.
The windows themselves are a mix of 1"x3" and 1"x2" pieces. I started with the bottom of each window, then the top, sides, and finally the mullions.
The side window is open, as in the picture. I haven't added the top of the lower windows yet, because I need to add clear styrene to the upper window first, after painting everything.
The front window looks like it is three separate windows, and I couldn't tell if they could open or were fixed, so I opted for fixed. I created the posts by using three strips of 1"x3" with the center one sticking out slightly. Once those were in place, I built the frame of the window itself in the same way as the others, so those center posts end up as 5 layers of 1"x3" with the center protruding the furthest. On either side, each successive piece is back just a little bit more to give it the proper "stepped" appearance.
The horizontal mullions are glued to the edge of the actual window frame. I did the outer mullions first, so I could line them up with the clapboard siding, then the center ones, to keep them as level as I could.
I started the door with a square of .010" styrene for the lower part, and used 1"x6" strips for the raised portions. The top was created using the same approach as the other windows, using 1"x3" strips.
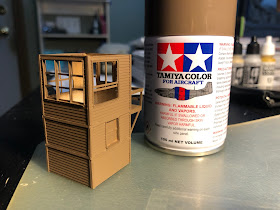
I painted the entire exterior with Tamiya AS-22 Dark Earth in a rattle can. The only color photo I have is a frame of a Kent Cochrane video, but it looks like it's just some shade of dark brown, including the trim. It's possible that it's a bit of a gold color with darker brown trim, but I can alter that with weathering if I choose. The same applies to the weathered platform and stairs.
The interior is painted by hand using Vallejo 70.644 Sand Primer from their Mecha line. I have no idea what the color should be, nor what sort of interior I'll eventually add.
Once painted, I added window glazing. The only tricky part was the open window. The upper glazing had to fit perfectly within the window frame. Then I added the painted 1"x3" for the top frame of the lower window, and the glazing behind that. The glazing is glued into place by Aleene's as usual. I'm out of Canopy Glue, but best I can tell that's a thinned PVA glue in that it dries clear and remains somewhat flexible. In any event, the Aleene's works just fine.
Next post, final touches...


No comments:
Post a Comment