When picking up supplies at Roger's, I noticed the Woodland Scenics Shaper Sheet, which ended up being different than I expected. It's a stiff foil sheet with some sort of felt/fabric material on top. It's intended to be used with plaster cloth, and binds to the plaster. But I wondered if I could use it in this location and put it under the track too, which covers the slots in the Woodland Scenics risers I used to keep the track level.
So I glued down a scrap of track and ballasted it using the ballast I sifted at Tilcon in Plainville, from the same area that the New Haven got ballast from Cook's Quarry, and some dirt from New Britain.
It worked OK, although there were a lot of fibers that stick up through the ballast, and I decided to skip using it under the track. Except in one location where there wasn't any foam support, so I wouldn't need to use so much ballasting material to bring it up to level.
At this point, it was worth seeing how the ballast would look.
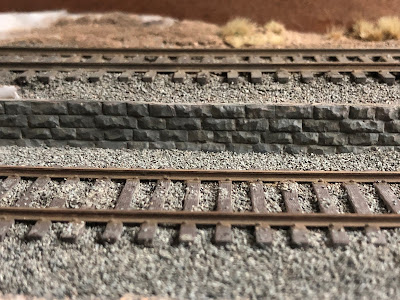
Which led me to realize that I hadn't painted the track first like I usually do so I used a Paint Pen for the initial layer of color, before the usual Pan Pastel weathering, and used the same technique on the wall.
Of course, now I wanted to see how the lower track and ballasting would look...
I need to add a cap to the stone wall.
The process is coming together nicely, and finally seems to be fairly repeatable.
For the rest of the area I went back to spraying all of the track with the Rustoleum Camouflage paint (only to find that it melts the Woodland Scenics Risers, but not enough that I had to take anything up).
I then add a thin layer of ballast, just enough to cover the area, and wet that with Future. I then sprinkle additional ballast on top of that, enough so the Future doesn't soak through. Once dry, I remove the loose ballast, then wet the area with Future and repeat with the same approach. This builds up the ballast in layers, but the top layer isn't saturated in the Future (or other glue) so it isn't darkened or have a film over it.
I use a very small pipette to apply the Future, and primarily rely on capillary action to draw it between the ties. Where I need to, it's narrow enough that I can drip future between the ties without getting it on top of the ties. If I do it's not a big deal. The goal is to avoid having a glue film on top of the ties or the ballast.
For the ballast on top of the ties, I use the paint pen to color the tie (which also works to cover any locations the Future did get on top of the ties), then sprinkle a few pieces of ballast here and there. Once that is dry, I use a Raw Umber Shade or Extra Dark Pan Pastels for the ties, then a Neutral Gray in places to lighten them up. In my era, it looks like the majority of tracks are well maintained and the ties are not a faded silver-gray like they are today.
For the rails, I used the Paint Pen (Woodland Scenics Railroad Tie Brown, if I recall, but the color is really irrelevant because the Pan Pastels provides all of the color) to wet the rails, then after letting dry slightly, I used Raw Umber Pan Pastels to first stipple (so it won't wipe off too much paint), and then "paint" the rails by sliding the brush down the rails to smooth out the look.
I then use the Raw Umber Extra Dark and Black to darken the entire area between the rails. All of this should be somewhat random yet consistent.
I'm very happy with the way this came out, compared to my earlier efforts (which means half the layout is going to look much better to my eye).
The stonework used the same technique in wetting with the Paint Pen, then a variety of Pan Pastel browns, blacks, and grays.
I've considered not using the Rustoleum, since the color really isn't going to show through after the later coloring. But I find that it gives a little more tooth to add the additional layers of paint and weathering.
Here's the wider area in progress. This is after another layer of ballast, before brushing and/or vacuuming the excess.
If you start with a clean vacuum you can reclaim your ballast if cost is an issue. For me it's a question of time, not money. The sifting screens cost less than $70, and my ballast costs me less than $20.00/ton. So I highly recommend sifting your own if you can.
While it seems like this takes a long time, I tend to work in small sections. I can do a layer of stuff over a foot or two in about 10-15 minutes, then move on to other things while it dries. I have additional work to do before I'm ready to do this whole area (primarily figuring out what to do with the backdrop), but I'd like to do this scene because it leads into the layout and is just scenic.


Randy: This ballast looks great! Rob Gross
ReplyDeleteVery helpful, Randy! Thank you!
ReplyDelete