Wednesday, November 2, 2022

I Did a Thing (No Sacred Cows)


Ever since I had the issue with the white film over the yard (and here), I have been struggling with trying to entirely eliminate it. For the main yard I had simply removed the track and all the ground cover, but I didn't do the main tracks or Track No. 5.

Several months ago, I started cleaning out all of the ballast and most of the ground cover to the section west of Main St. In addition to not taking very long, I was able to address a few other minor issues in the process.

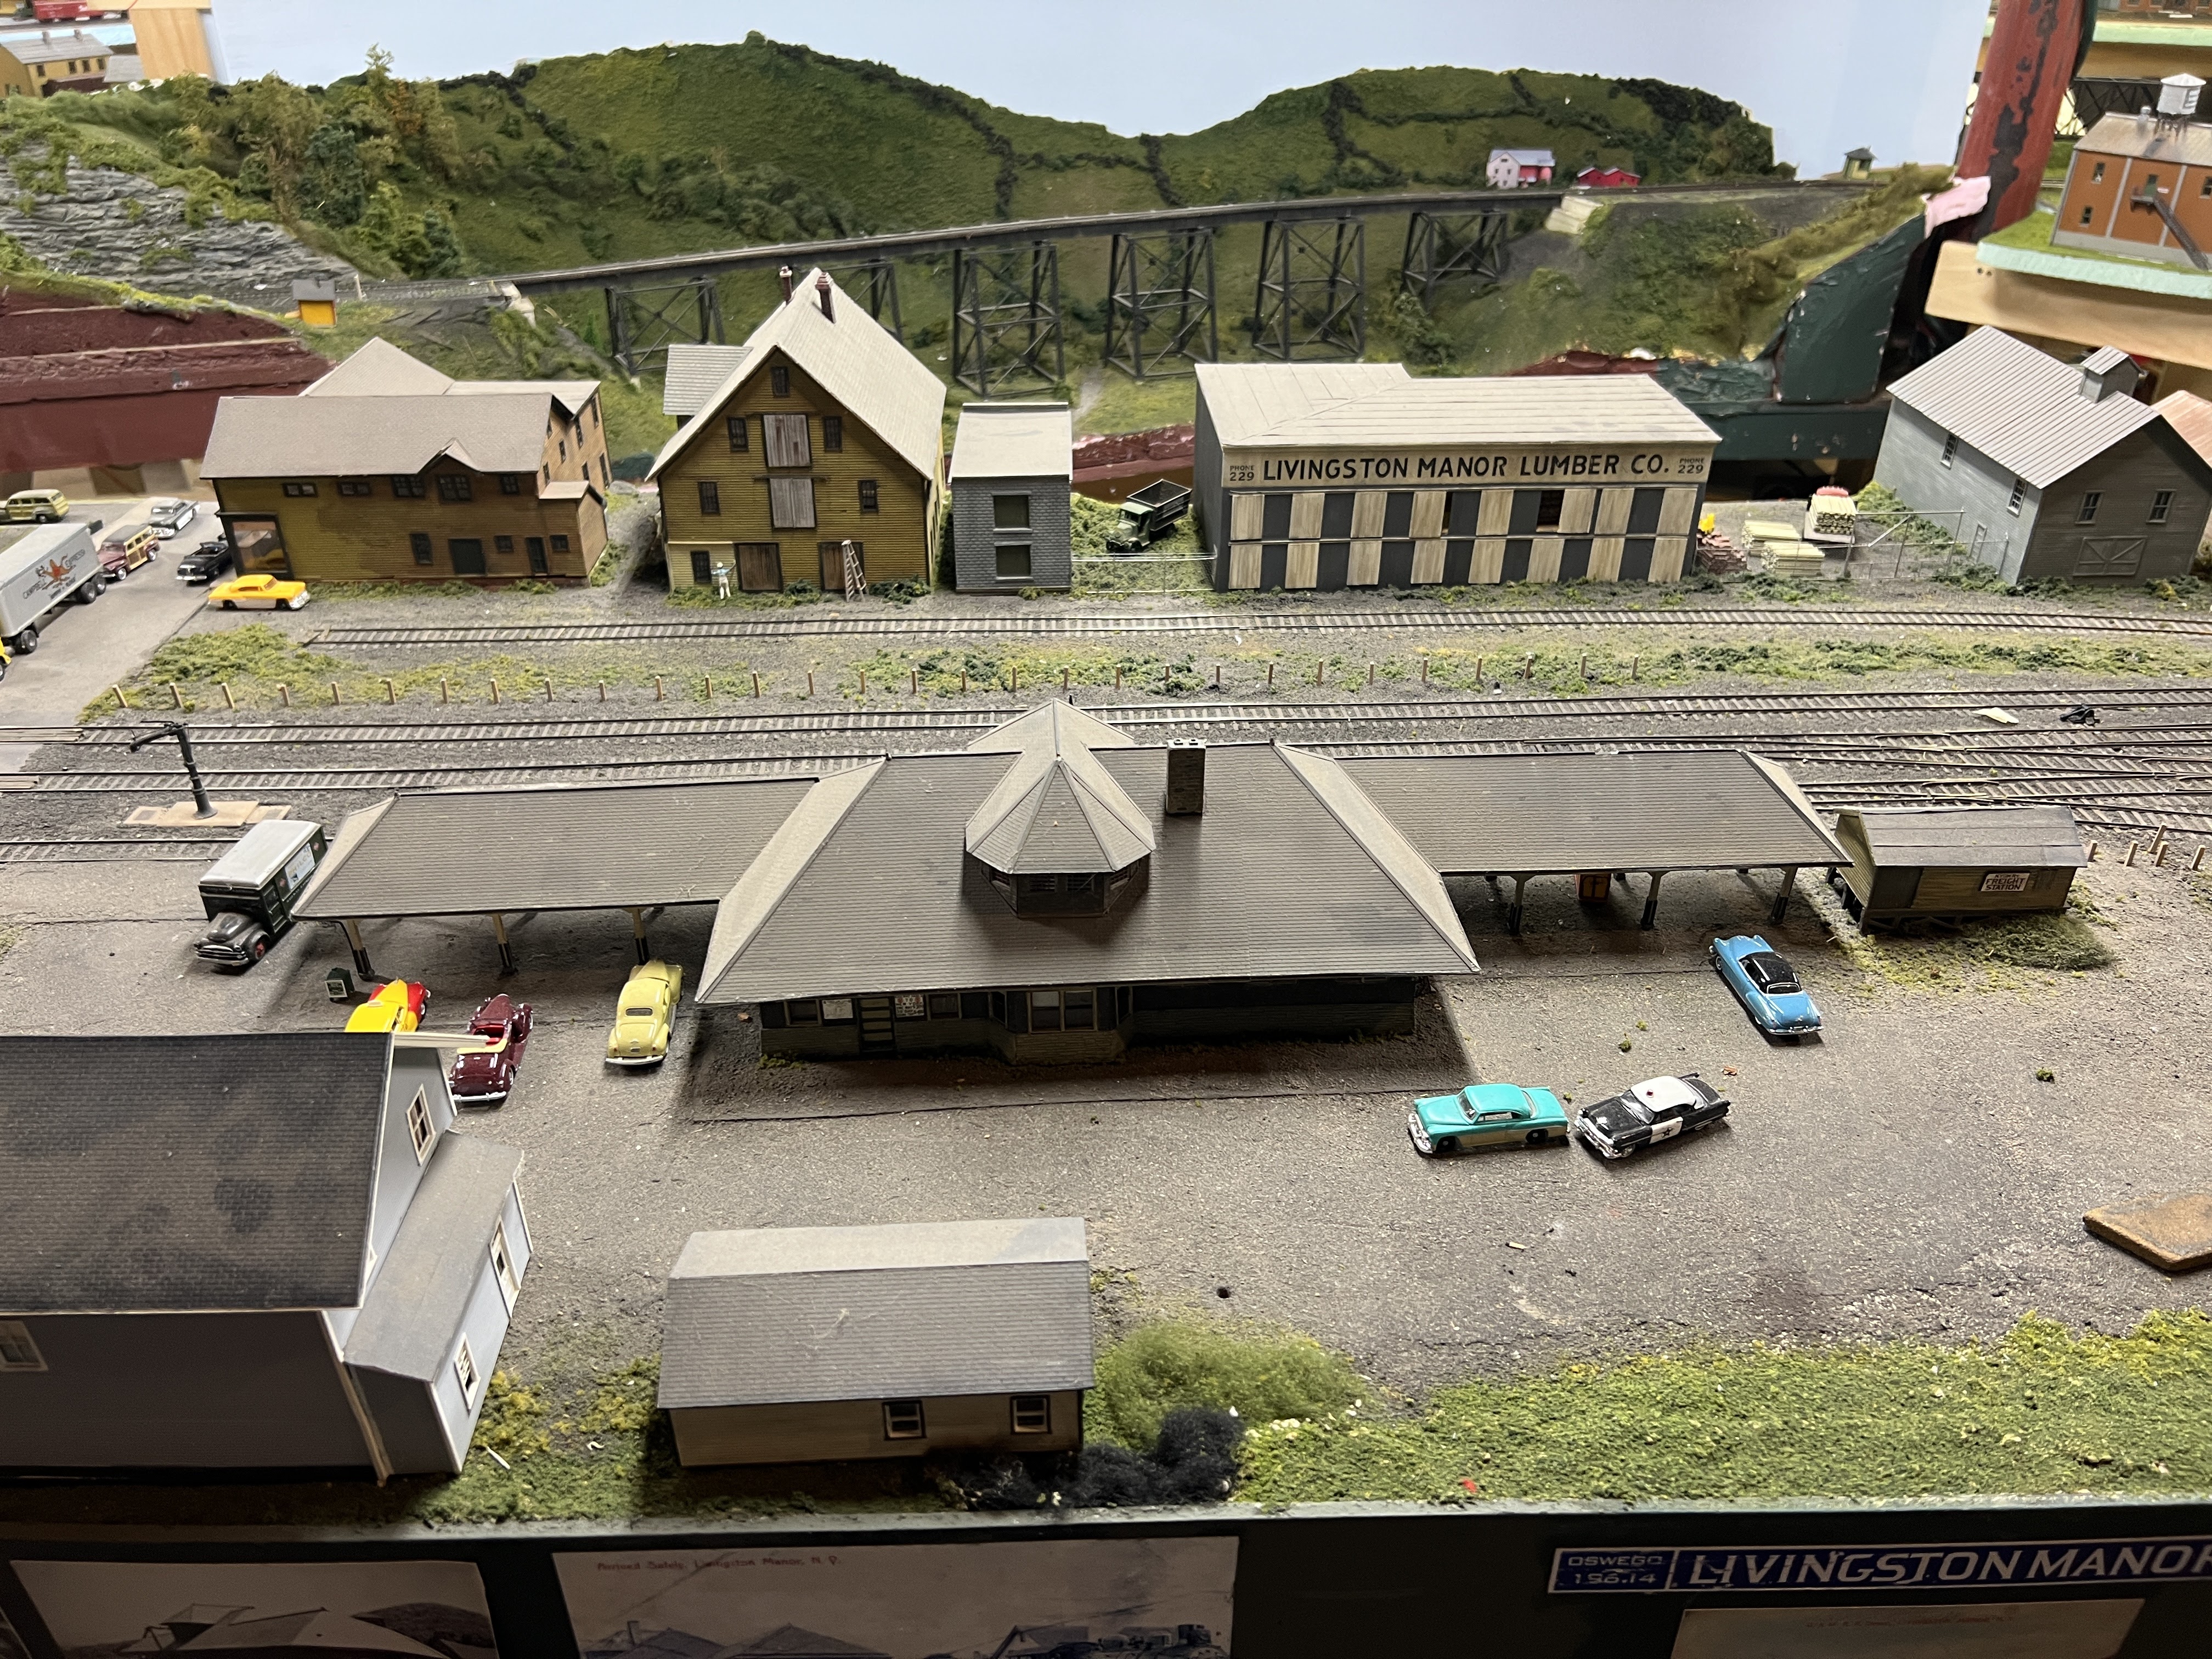
I wasn't entirely happy with how the ground cover, ballast, and track weathering itself. At the time I really liked it, but I've continued to experiment and improve my approach. This is the centerpiece of the layout but wouldn't be up to my current standards. So, I started the process of removing the ground cover and ballast here as well. As I was doing so, it occurred to me that I could do the same thing I did before with the yard tracks, leaving just the main tracks and Track No. 5 to clean.

Not all that much, but it is a slow process. I considered what replacing these tracks would entail but didn't want to go there. But then I damaged a piece of track. Easy enough to fix, but I could also just cut out that section of track and replace it. In fact, I could cut out all of the track, leaving the crossovers and working from them, right?

One of the things that has always worked for me is to plant the seeds of a problem in my brain, and then just go about my regular activities. In a few days, if there's a solution to be had, it will just come to me. In this case there were several other factors that I hadn't considered that really settled the best course of action.

1. I made no allowances for under-table switch actuation. I didn't intend to use it but learned that I need to tie in the main track switches with the signal system. This requires removing the spring from the throwbars, and installing them under existing, ballasted track. Furthermore, at least one is directly over joist.

2. There were some issues with the track arrangement. For example, the location where the crossing shanty sits is much tighter than it should be. Also, as I've learned more, I set the Whiting Street Yard tracks on a prototypical 14' track center. In addition to looking better, it makes enough room to add a missing yard track in New Britain Yard. Correcting the arrangement also moves a switch from Track No. 5 to a side track where it belongs, and properly extends one of the yard tracks across Elm Street. The new arrangement also increases capacity of the yard by about 10 cars. 

3. Laying new track would be much faster than cleaning and working with what was there. Furthermore, it feels much more like progress than the slow process of cleaning out the ballast. That also didn't address the issues with the track weathering either. The only delay is that Microengineering turnouts aren't readily available in Code 70 right now. But I've found much of what I need, and the rest is on the way shortly.

4. I can add all of the detail parts to the track at the bench, before installing. I can also switch to using KV models joint bars instead of standard rail joiners, improving the appearance even more. 

It also feels like progress. Cleaning out old ballast and "fixing mistakes" feels like a step back. It's often hard to step back and decide that the best option is to "start over" but with over a decade of working on this layout, helping friends on theirs, I've obviously developed new skills, perspectives and goals. 

I can confirm that grout does a great job of securing track.

Online there are a lot of folks who have built multiple layouts. My buddy Bill has been rapidly building his new layout. In his case, it was necessity that required the removal of the old layout. Tony Koester tore down the Allegheny Midland because he eventually found it wasn't lining up with his actual goal (even if he didn't realize it initially) of modeling the NKP. Progress comes in many forms, but in the end it really just means one thing - moving closer to the goal.

This seemingly drastic step is definitely achieving that, all while making a number of tasks that would be more challenging and time-consuming if I tried to accomplish them with the existing trackwork. I wouldn't even call it a step backward since it will drastically improve the scene with a decade of things I've learned along the way.

Monday, October 17, 2022

Research - Railway Mechanical Engineer

I'm well into writing an extensive article on New Haven heavyweight equipment. Fortunately, there are a lot of historical records and resources online, particularly periodicals and professional journals. Even better, most are searchable (although skimming through them manually often still yields further insight). 

Railway Age is probably the most commonly known such journal.

Many of these periodicals changed names over the years, and/or were combined with other journals. They often maintained their volume numbering system, from predecessors, which can be confusing because you may be looking for editions of, say, Railway Age Gazette, Mechanical Edition and not find many

One such periodical is Railway Mechanical and Electrical Engineer, which was absorbed into Railway Age in 1953. But it only used that title for a short period. Here's a list of links to the issues of that periodical, along with its predecessors all linked to online sources. It retained its volume numbering system from American Railroad Journal starting in 1832.

Many of these are hosted in multiple places on the internet, but the ones I have linked have copies that are available to download without restrictions.

Happy reading and researching!

American Railroad Journal

  • Volumes 1 (1832) to 60 (1886)
    • This merged with

Van Nostrand's Engineering Magazine

      • Volumes 1 (1869) to 35 (1886)
    • to become

Railroad and Engineering Journal

  • Volume 61 (1887) to 66 (1892)
    • and then

American Engineer and Railroad Journal

  • Volumes 67 (1893) to 85 (1911)
  • Volumes 87 (1912) and 87 (1913) were retitled American Engineer
    • Another journal:

        • Volumes 1 (1870) to 16 (1885)
          • Only 11-16 are currently available online.
            • became

        • Volumes 17 (1886) to 26 (1895)
          • then was absorbed into American Engineer and Railroad Journal

    • Partway through 1913 it was acquired by the Railway Age Gazette:

Railway Age Gazette, Mechanical Edition

  • Volumes 87 (1913) to 89 (1915)
    • It 1916 it was retitled to:

Railway Mechanical Engineer

  • Volumes 90 (1916) to 123 (1949)
    • After 1949 it became

Railway Mechanical and Electrical Engineer

  • Volumes 124 (1950) to 126 (1952)

Wednesday, September 14, 2022

NHRHTA Shoreliner Index


John Kasey has compiled an excellent index for Shoreliner magazine and has graciously allowed me to host it here so anyone can access it.

John Kasey's Shoreliner Index

Of course, I highly encourage you to subscribe over at NHRHTA, and you can also order many back issues there too.

Shoreliner 30.4 has an excellent article on the New Haven DERS-1b (Alco RS-1) locomotives written by John. 

Tuesday, August 16, 2022

Deluxe Heavyweight Car Side Test Prints

Here are some initial test shots of the sides for the Deluxe Coaches, Smokers, and Baggage & Smokers. I'm quite happy with how they've come out. 


There is some slight ghosting next to some of the rivets. I'm not sure they will show when primed/painted, but they should be easy enough to clean up if needed. We've (well, Chris has) also made some adjustments to the CAD that we hope will prevent it in the final prints. 


I think we're still on track for having them on-hand at the NHRHTA Reunion on September 10 in Essex, CT. 

I've also been finishing up the Heavyweight clinic for the Reunion. I'm only covering coaches (including combines) in this clinic. It's already over 130 slides and I only have about an hour. I need to compile the handout still - there will be lots of data.

The remaining slides have been split out into three other clinics now - Part II is Head End Cars, Part III is Parlors, and Part IV will be the Sleepers and Food Service cars. I could easily make each of these clinics 90 minutes, so I'm not entirely sure where I'll be presenting them just yet. I'm thinking Cocoa Beach may be my next opportunity.

Wednesday, July 20, 2022

New Haven Heavyweights - New Models Coming

This is one of the projects that has been taking up much of my modeling time...

For those who didn't make it to the New England/Northeast Prototype Modelers Meet, Chris Zygmunt and I were substituting for John Greene of Bethlehem Car Works who couldn't be there. Part of the reason we're involved is that we are working on several new kits with John, that we hope to have in stock by the NHRHTA Reunion on September 10.

The first group of cars are the Deluxe Coaches, Smokers, and Combine.

These are based around the Branchline Pullman core, so assembling the kits will be very similar to building a Branchline (now Atlas) car. 


Yep, many of these heavyweights received McGinnis colors.
This is 8113, one of the Deluxe (or De Luxe) coaches.
Some of them ran into the mid-'60s.


Smoker 6824 was converted from one of the Deluxe Coaches and utilizes the same plan.


Smoker 6813 is one of a second class of Deluxe smokers.
This is a different plan, with only a men's lavatory and saloon.


In addition, there is a Deluxe Baggage and Smoker based on the same design.


These have never been available in HO scale at all, plastic or brass, to the best of my knowledge, and the available kits will cover the life of the cars.

This includes new trucks that will be an upgrade over the Labelle white metal castings (formerly Bethlehem Car Works, formerly Cape Line). In addition, we are producing the trucks after they were modified starting c1948 with the removal of the top equalizers and the addition of drop equalizers. These have also never been available in any form.

The trucks will be available separately.

We also hope to have another run of the excellent 15' Apartment Baggage & Mail cars at Essex to supplement these cars.


Wednesday, July 13, 2022

Where has the year gone?

Well, after a very consistent 2021, I've been very inconsistent posting in 2022.

Even the NE Proto Meet didn't kick off a flurry of modeling activity this year. It's not that I haven't been working on anything at all though, but I think it's time to take stock of where I am and what I need to work on this year.

First off, I've been able to put in a lot of hours at CNZR since last fall, which has severely cut into my normal modeling time. We're also nearly 23 years in this house (new when we moved in), so household projects have been taking up a lot of the time that has been left each week. This is all in addition to my usual "day job" activities that pay the bills. We usually only take one vacation each year, but for whatever reason we've already gone away once this year and have three more trips over the next several months. It has been an unusually busy year on non-modeling activities.

On the model railroad "business" side, rebuilding the website is still behind schedule, but fortunately Google extended the deadline another 6-months before the old site is shut down. I'm also involved in several model kit (passenger and freight car) projects that will start to be released over the next 6-months or so. In addition to the research and work related to the production of the kits themselves, I'm also working on getting clinics prepared related to them. 

I have also found that with so much going on, when I have had time to get down and work on things, I've lacked motivation or even the energy to do so. Things are progressing, just not at a record pace.

The point is, like most of us, model railroading fits within the spaces of the rest of our lives.

Starting the second half of the year, what are the goals? After watching Bill's layout growing so quickly, operating on Chris' layout and, in particular, visiting a number of new layouts this year, there are two obvious goals that I continue to avoid, despite my declarations in the past.

  1. Operating
    1. Test and glue down remaining track.
    2. Install feeders, including modifying the mainline wiring for signaling.
    3. Install switch machines for the mainline switches.
  2. Base Scenery
    1. Ballast
    2. Ground Cover
    3. Fences/Gates

Operating is key, because I really like getting together to run trains. I've been working on things like passenger cars, some locomotives, etc., because in the long run they are key elements that need to be completed for full operating sessions. But as I've noted before, for a 1953 session all I need are RDCs, two 44-tonners, and another switcher of some sort for Stanley Works. That could easily be the third 44-tonner, so that means getting those three locomotives finished. Not all of the passenger cars, etc.

While not all of the layouts I've seen were completed in terms of scenery, I definitely felt that those that were further along were far more inspiring than the current state of my layout. Even those layouts that aren't "complete" yet, like Bill's and Chris', they have a significant amount of scenery done.

Since most of the time I'm visiting a layout specifically to operate, my focus hasn't been on the scenery as much. I've appreciated the work they've done, but it wasn't as much of a priority for me. However, when visiting several layouts for open houses after the NE Proto Meet, my focus was entirely on the scenery and the layout presentation. 

For all practical purposes, the amount of scenery Bill and Chris have completed on each of their layouts is no more than the space my entire layout occupies. And those are completed scenes, with structures, etc. I should be able to complete at least the basics relatively quickly. I know I can, since I did it on Harvey's layout.

It's not to say I've done nothing this year.

In addition to the passenger cars that I've been working on, I have built several Campbell horizontal oil tanks (2 sizes), a Rix vertical oil tank (not pictured), and a pair of Walthers LP tanks that I shortened. The three tanks on the right will go elsewhere, but the LP tanks, pump houses, and single horizontal tank are mocked up where I think they will reside for Fafnir Bearing. 

The next few weeks look to be just as busy, but I can at least start prepping for some of the jobs that need to get done so I can work through them more quickly.

Sunday, July 10, 2022

In Memory of Craig Bisgeier

In April, I had posted a picture on Facebook of 79-lb rail made for the NY&NE railroad in 1895:


Craig posted that one day he'd like a chunk of rail to make an anvil. 

Easy enough.

I got a short piece of 131-lb rail from our yard. Of course, AJ (the owner of the CNZR) always has more information about anything railroad related. When I asked if I could take it, he glanced at it, then stood it on its end and asked if I knew the difference between 131 and 132-lb rail. Apparently the 131-lb rail had the tendency to crack or break where the web meets the head, so the 132-lb rail has a different radius fillet between them, adding 1-lb per yard in weight.

I always find this interesting, and I know Craig would too. I didn't tell him I had it, and it stayed in the back of my car until I could surprise him at the NE Proto Meet.

All day Friday I was hoping to see him so I could take him to the car to get the rail, and a few other things, and was looking forward to a day of trains, lunch, dinner, and drinks with him. But I never saw him. It wasn't until Saturday that our friend Jim informed me that Craig had some sort of accident at home, that caused a stroke. He had been in the hospital for a week or more on life support.

What little I knew wasn't promising, but then with my own family's extensive medical history, I was cautiously optimistic that he might pull through.

Unfortunately, I've learned Craig passed away yesterday. 

For now, the rail sits in front of my house as a reminder. I'm not sure if I'll do anything else with it, but it's there.


This story is typical of the relationship between Craig and me. We were always experimenting and learning new things. He had a passion for the process, and for tiny details and esoteric knowledge that I share, and not just on trains. We're both in IT and shared lots of other interests too. While we'd chat periodically, or communicate via email, most of our direct interaction was at train shows where we'd have plenty of time to discuss possibilities for producing new models for us and others.

I first found Craig via his website and sought him out soon after. He lived in NJ and I'm in CT, so it wasn't hard to find him at the NE Proto Meet. We operated Rutland Yard together on the final operating session at RPI. We were constantly discussing his perpetually incomplete software program "Here to There" for producing operations paperwork. Even if the program was never fully operational due to technical issues, delving into the prototype's operational processes and how to convert that into something the computer could emulate was a huge help for both of us in terms of understanding prototypical operations and how they all fit together.

Last February, out of the blue, I got the following message:

I've already related the story of this smokestack here, but I brought the model to the Proto Meet and it was to be the first time he would see the completed model in person.

Aside from the projects, models, and ideas, he was first and foremost a great of example of what I love most about this hobby - the people and the modeling community. 

I'll, no, we'll miss you Craig.

Wednesday, June 1, 2022

More Passenger Cars - 15' RPO

I've been working on a number of things getting ready for the NE Proto Meet so I'm a little behind on posts. In addition to the modifications for the 600-series coaches, I've been working on an RPO.

A year or two ago Belthlehem Car Works released a NH Baggage car with 15' RPO apartment. Joe Smith detailed how he scratchbuilt a car with a 30' apartment on his blog.

The kit has a cast resin roof, injection molded ends, and 3D printed resin sides, with the original CAD by John Sheridan. The floor is a piece of styrene with injection molded fishbelly center sills. It's a pretty easy kit to assemble, although I felt the instructions could have been a little clearer in regards to building the floor. I'm not sure my approach matched what was designed, but it worked for me. 

Here's a picture of one of the cars in Danbury. One of these cars was regularly assigned to train 131/136 so it's a key car for my layout.


In examining photos it appears that by my era, the mail catcher bar isn't used, or at least not by the time the train gets to New Britain. It may be stowed after passing stations that use a mail crane. I didn't really like the etched parts either, so the simple safety bar seems like a good option.

Regardless, I needed to make the brackets used to hold either of the bars in place. To do this I glued a couple of 1"x2" strips at one end, and then put a piece of wire between them.


I then glued it on the other side, and used tweezers to squish the top piece to fit tightly around the wire.


After doing this at the other end, I trimmed them to fit. The wire is moveable, since it's not glued by the styrene cement.

That allowed me to glue one side on first...


...then the other.


In these photos you can just make out the 3D printing lines which are very, very fine. This is not a resin casting of a 3D printed part.


Sunday, May 22, 2022

Visiting an Old Friend

A couple of weeks ago we ran a test session on Bill's new layout. I'm terrible at taking photos while doing things, since I'm more interested in being in the moment. But we had a great time, and it's a lot of fun working the different jobs so we can help Bill fine tune the operations.

However, since I arrived a little early, I did take some photos a couple of days later when Bill and I went to Bruce's house for an inaugural test session there on his layout. What makes it special is that Bruce's layout is actually Bill's old layout.

It was nine years ago (!) that we dismantled Bill's O&W layout that was in an upstairs bedroom. I don't remember exactly when, but our last ops session would have been shortly before that. Since then, we've been helping Bruce reassemble it in his basement. Long time readers may be familiar with how much of an influence Bill and this layout has had on my modeling. I cover it in more detail in this clinic.

What's most interesting is that it feels both like the same layout, but also like a new layout. Since the decks are no longer stacked, it opens up the scenes in a different way. And Bruce's additions to tie them together, plus an additional freelance town yard, also add operational options that we didn't have in the past. I started pulling out of staging into the new yard so do some quick switching first, then run through the entire layout. There were a few hiccups but overall, it worked well. This is where it really felt new, with a through train that no longer had to traverse a helix.

After that I ran the Roscoe local, and that felt just like old times - switching in Roscoe, plus a little in Livingston Manor. Once you're focused on the actual work, whether there was another deck above the town didn't really matter.

The biggest change is that Bruce is running mostly steam. Because of the helix and the tight curves to accommodate the small room, Bill hadn't designed the original layout for steam. Bruce was able broaden the curves and has made some additional modifications to the track arrangements to accommodate this.

It was enormously fun to be running on this layout with good friends (and a few good beers). It was like visiting an old friend that you haven't seen in years, and I'm looking forward to when Bruce is ready to host regular sessions.

Livingston Manor


Roscoe


The new yard.


Sunday, May 1, 2022

Walthers Heavyweights on 24" Radius

My main track minimum radius is 26" and 28" radius. When I first got the Walthers parlor cars for the 600-series conversion, which note on the package that they will navigate 24" radius curves, I was surprised to find that they didn't even like the 26" radius. They would get hung up because something is rubbing on the underframe, or occasionally derail. I found that they were reliable on about a 26.5" radius, but I wasn't going to be rebuilding the helixes, so it meant figuring out how to modify the cars.

Now that I've decided to utilize the Walthers curved turnout in one location, I need to get them to work with the advertised 24" radius since that's the radius of the inner leg of those turnouts. Otherwise, lazy or not, I'll need to handlay a replacement with a proper 26" radius. However, the cars would still require some tuning to run reliably.

Restrictions to Minimum Radius

As modelers, one of the biggest restricting factors we have to deal with is space. As a result, we have to use much sharper radius curves than the prototype would. In addition, due to manufacturing limitations, many of the operational parts of are cars are overscale. Regardless, it's typically longer cars, like passenger cars, that have issues navigating our model curves.

From a design standpoint, modelers prefer broader curves because they look better, especially with longer cars. The amount of visible overhang is particularly obvious with older layout design approaches, such as waist-high benchwork where you're always looking down. In my case, the 26" radius curves on the inner main track looks acceptable since the benchwork is high, and it will be even less of an issue as structures are built. The switch that I need to be concerned about operationally is just at the entrance to the helix. It's not a very visible location and appearance is a non-issue.

There are two things that can affect what the minimum radius is. One is that the corners of the car themselves touch, and force one or the other car off the rails. This is unusual but is easy to fix by using couplers with longer shanks. These cars are designed with a coupler box that moves toward the side of the car to effectively lengthen the draw, so that's not the limiting factor.

The second, and more common, is truck swing. A car without a center sill would be able to handle very sharp radius curves, whether it looked good or not. But most cars have center sills and, as the car gets longer, that sill restricts that truck swing more.

Modifying the Cars

In this case, there are four locations where there is contact between the trucks/wheels and underbody that are contributing to the problem. Since I don't want to remove the center sill above the truck entirely (leaving an unsightly open gap that's visible from the side), how much more swing we can get is limited.

The backs of the wheels (circled) touch the center sill just before the brake beam (arrow) does.

You can also see that the mounting screw is offset. This offset increases the truck swing against the center sill. Relocating the mounting hole to the center of the truck would help, but is a much more involved solution and thankfully we don't have to do that here.


The wheels can also touch the plastic centering springs on the extended coupler box.


The tricky one is that inner truck assembly screws can also hit the center sill, even though there is a notch designed to accommodate them.


Here we can see the notch that is cut in the center parts, and also the portion that is molded into the underframe as part of the bolster. The arrow points to the plastic centering spring.


The centering spring is a simple matter of cutting them off. These cars will always be coupled in their consists, so there is no need to worry about them self-centering. Furthermore, I don't mind manually centering a coupler on a car if needed anyway.


I measured the center sill to just beyond the truck and shaved off the flange along the top. There's no need to remove anything else, the center sill itself allows enough truck swing. These flanges are what the wheels/brake beam can hit. Once painted, this (lack of) flange is virtually invisible when viewing from the side.


I used a Dremel to make the notch for the screws deeper. I left the center portion so there won't be a visible gap from the side.

Other folks have also filed any burrs off the screw, so I did that too. 


It only takes a matter of a few minutes, none of the modifications are visible when viewing the car from the side when on the track, and they very reliably handle 24" radius curves now.

Wednesday, April 20, 2022

600-series Coach Interiors

For the 600-series coach conversions, like the New Haven, I need to modify the interior and remove the rooms and parlor chairs and replace them with walk-over coach benches.

Before I get to how I'm detailing that, it probably helps to get there first...

Disassembling the Walthers Parlor Car

The model is ingeniously designed, and, except for a few screws and the windows, everything snaps together. There's an inner plastic frame and roof and sides simply snap in. To get the roof off I used a plastic painter's palette knife to pry the sides outward to free it. You can see the notches at the top of the false side, with the slots underneath them. That's where the roof attaches. The round holes are for small alignment pins on the car sides.

The sides attach the same way, into different slots. You'll note that this side doesn't fit. The slots are spaced in a way that each part only fits one way. I'm not terribly concerned about the slots for the car sides. I'll probably glue those in place when I'm done and leave the roof as just a snap-in part.


The subfloor is two metal weights sandwiched between the floor and the chassis. 
These are held in place by plain old clear tape from below.
The bulkhead is a snap in piece, and the ends also snap in.


To take out the interior you must remove three screws.
Two are under the trucks. One is in the center.
I'm not using these screws.


There are two thin metal pickups for electrical.
I won't be using these. They just pull out with a pair of pliers.
It requires a bit of effort, as they are taped in place.


Once the screws are removed, you can take out the interior in one piece.


There is some double-sided tape holding it in place in the middle.
This is also used to hold the chassis on when the screws are removed.
The steps are held into place by the chassis.


If you aren't going to use their lighting system, you can remove the connectors.
This requires removing the end and the chassis.
You can see the double-sided tape that held the chassis and pick-ups in place.


The floor itself is notched to fit around the snaps for the sides.
It also has small squares in an asymmetrical pattern, so it fits one way.


Building the Interior

I used the seating inserts and partitions from the Branchline (now Atlas) coach kits. You can get these parts from Bethlehem Car Works. I started by matching the thickness of the original floor with .030" styrene. I then cut out the four new floors I would need.

After a quick test, I found that it isn't necessary to cut the notches to fit around the snaps for the side. Instead, the floor can just sit on top of them. I will probably add a couple of pieces of styrene to the bottom so I can use double-sided tape to attach it to the subfloor so it will stay put.


I drew a center line, then marked out the aisle for reference: 23-3/4" from the plan, or 12" on either side is fine. Precision isn't necessary here since it's not going to be very visible from through the windows.

The women's saloon is on one end of the car and is 6' long. This is on the same side of the car as the car side that required the window arrangement to be modified.

At the other end, it is split into two parts; the lavatory is on the same side of the car as the women's, and the lavatory is on the opposite. These are both 4'-91/2" long. These are very close to the size of the Branchline lavatories so I just used those.

They consist of two pieces, but the partition is designed to fit into the Branchline side. I removed this long tab to make a simple partition.


I use a UMM scribing tool to mark the styrene part, rather than a knife. This carves a 'v'-shaped groove and leaves little squigglies of styrene. It is much smoother than using a knife and cuts faster. It's actually removing material, as opposed to a knife squeezing between the parts it's separating without removing anything. You can get a straight cut on the ruler side by tilting the tool.

A couple of passes is all you need before snapping the styrene, but in this case it's a small section that's tough to get to bend over. Instead of my usual scalpel, for thick styrene I'll use a utility knife. The scalpel blade is too flexible to use a lot of force (they can snap) so this is faster. A couple of passes with a file to square things up is all that's needed.


For the women's saloon, I used the stock branchline part, and glued an additional section of the partition to lengthen it to the required 6'. If you look carefully at the parts, the edges are slightly beveled. This is to facilitate them being removed from the dies. I make sure the bevel is the opposite direction between the two parts so it will be nice and straight when glued. Then I cut it to size and remove the tab.


With this ready, I mocked it up inside the car body.


The important thing at this point is to make sure the partitions are where they belong.
You don't want one in the middle of a window. As expected, these are perfect.


The seating needs to be rearranged a bit.
I remove the two ends (where the lavatories are) first.


The seats have a notch at the bottom of the sides.
This fits into the Branchline side, but is too long for the Walthers car.


I just snip them off with sprue nippers.


Three of the models I'm doing were built to the same plan. I had to deduce the plan for the fourth. In Wayne Drummond's excellent article Butterflies to Caterpillars (Shoreliner 21.3) are several pictures of the conversion process of parlor car "Gertrude" into coach 633. There are photos of each side, which made converting the car sides easy, and several interior photos while it was being modified.

It's clear that there is a single women's saloon, on the left side when looking toward that end of the car, and two rooms at the other end of the car. Looking at the exterior, there are two windows with frosted glass at the left end of that car side, the same as the other floor plan. In one of the interior shots you can see that there is a water cooler just next to the women's saloon, also like the other floor plan. And they are both 88-seat coaches.

With this information, it's clear that the interior arrangement is the same, and the men's saloon doesn't have a window. That makes it easy, since all of these cars have the same interior.

The Branchline seating is spaced 3' or so apart. The Plan shows a 3'-1/2" spacing. At either end are seats spaced slightly farther apart. I didn't do anything other than just get the arrangement correct with using a spare seating part.

My initial plan is to not glue the seats in yet so I could paint the floor and partitions separately from the seats. However, I also want the floor section of the Branchline seating. So now I think I will glue the seats in prior to painting, and hand paint the seats.

These cars (like most, if not all, New Haven coaches) have walk-over seats. At the end of a run, the conductor would reverse the seats in each car. Of course, we can't do that on our models. I will be installing passengers in the cars. While this probably won't be noticed by anybody while operating, it might show up in photos. Since these cars aren't turned at the end of the run, and I want to feature the car side that has been modified, I installed the seating in two of the cars facing the women's saloon, and the other two facing the other end of the car.

This interior is correct for coaches 600, 602-606, 608, 612, 619, 621, 622, and 627-37, or 22 of the 60 cars. Nine of which could have been assigned to trains running through New Britain during my era.