Thursday, July 30, 2020

Modeling NY/YN Freights - DERS-2b (RS-2) 0502 and 0503 - Part II

To Part I

Water Tank
When getting started on this project, one of the main things I wanted to fix was the water tank. The tank on the P1k model is too shallow, and there's a lot of space under the locomotive. 


The Kato model looks better in this regard, and I found that the water tank and air tanks were a separate part too. However, it's cast as part of the chassis on the P1k model and there was no way I was going to try to mill all of that off.

The next option was to see if I could use the Kato chassis. The Kato model itself is nice, but the railings are a bit thicker and, as I've seen others report, the radiator fan housing is too tall (although irrelevant since I would have drilled it out for the KV etched fan grill, and I could have filed it shorter). 

Getting it to fit the P1k walkway and shell was a bit more of a challenge than I thought. In addition, the bottom of the chassis is cast at an angle, which not only looks wrong, but would complicate adding a few parts that are needed. I also preferred the rendering of the sideframes on the P1k model (the trucks, including the sideframes, appear to be almost exactly the same as the Athearn RS-3).

So the next option was to try to build up the water tank on the P1k model. This turned out to be easier than I thought.

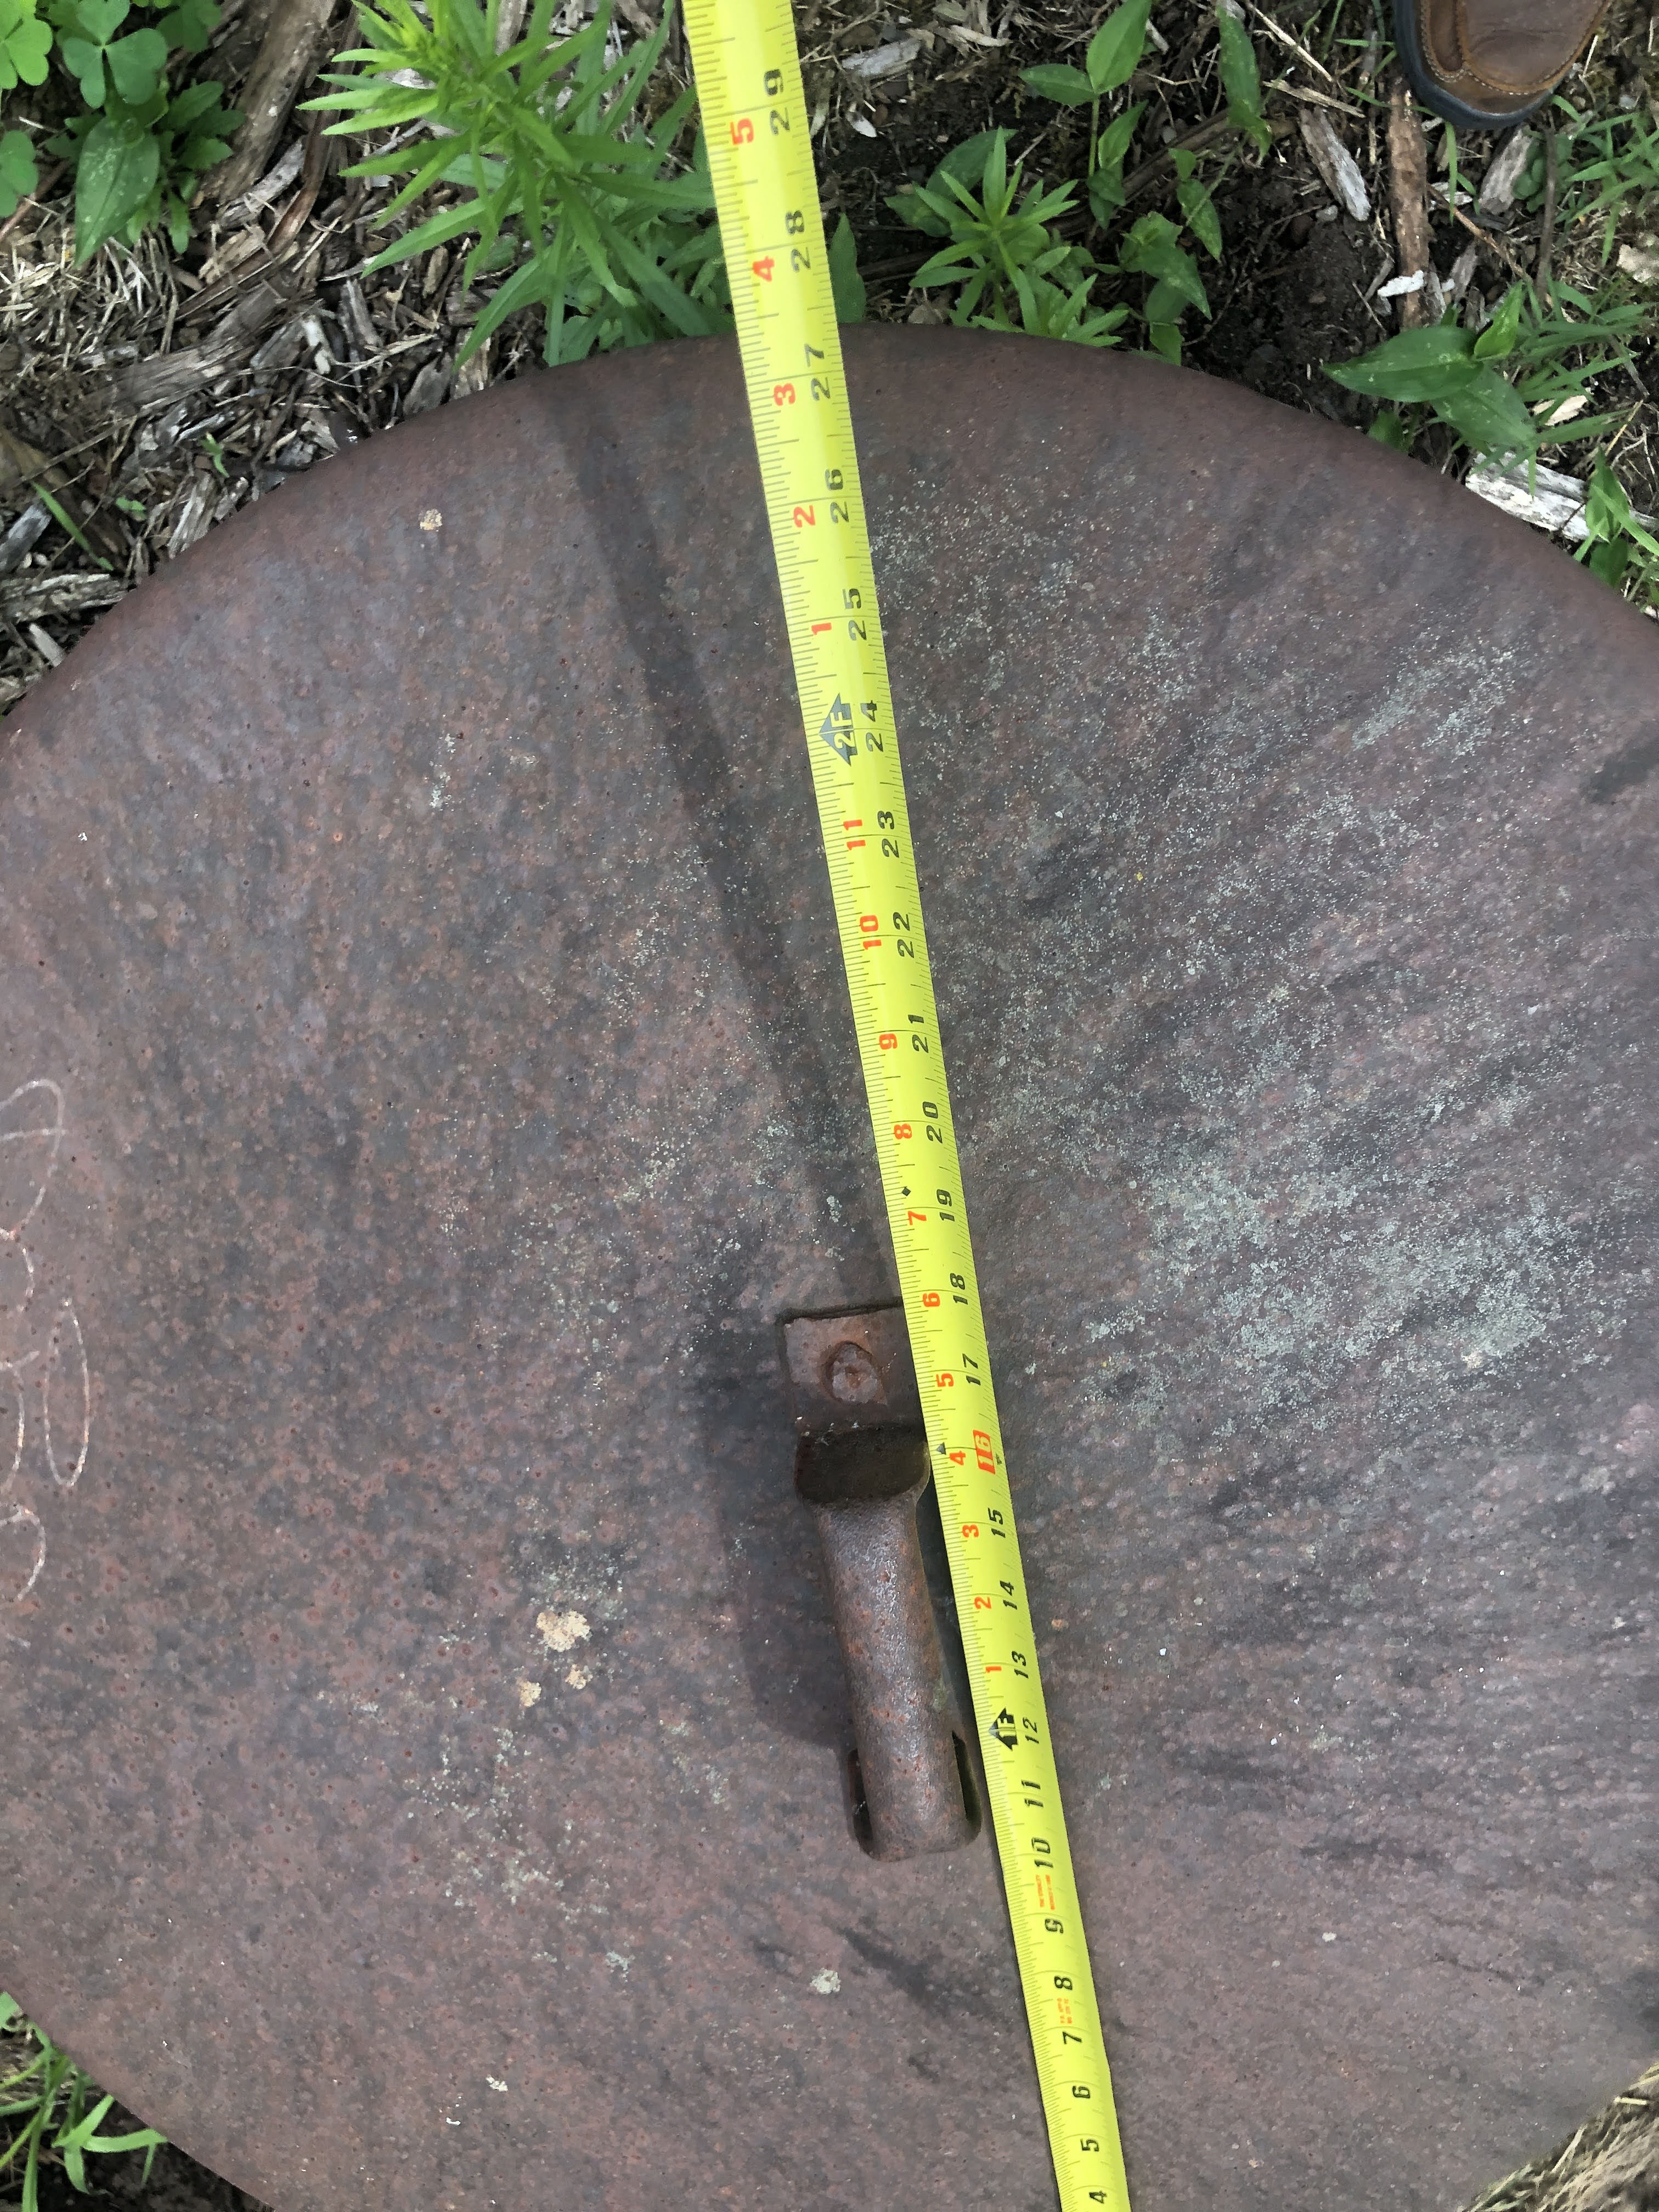
This is the P1k chassis showing the water tank.

This is the Kato model. I also like the air tank better.

This is the p1k model with a built-up styrene tank that fits over the existing one.

I made a rough template using cardstock, then built it out of sheet styrene. The air tank is cast as part of the chassis as well, and it's attached to the water tank, so I had to create a notch on each side to accommodate that. I also didn't make an end next to the battery boxes, because there should be a space between the two.

Toolboxes
At least I think they are toolboxes, one on either side of the water tank. It looks like they are also present on the RS-3s, so I'll do the same thing for those. For the first one, I eyeballed the length in relation to the air tank.

I started with a piece of scale 2" x 12" and glued it to stick out what looked like an appropriate amount. After deciding it should be thicker, I added a second piece. I then glued another piece to create the angled lid.


Next I had to file a small part of the lip at the bottom of the water tank, then used 1" x 8" to glue to the sides. Once that cured, I used sprue nippers to cut the side to shape, and then filed everything to finish.


I built the second toolbox (?) as a separate part. I started by laminating strips of 4" x 12", 2" x 8" and 1" x 8", with all three flush along one of the long edges. I then filed the across the top of the 1" x 8
 so it formed the angled lid, essentially by trying to not file the edge the would be against the water tank, and filing the outside edge to the top of the 2" x 8".


After test fitting it on the bottom, I decided it needed to be larger. So I used a 4" x 4" on the top, a 2" by 6" on the front, and then used a 1" x 8" to create the angled lid.


After test fitting, I cut one to length to test.


I made the ends using 1" x 12" then cutting and filing to shape. I also filed the slightly larger rounded radius along the top front, and a slight radius on the bottom front. Because I made a long strip I was able to cut one for both RS-2s, and also will have some for the RS-3s later. 


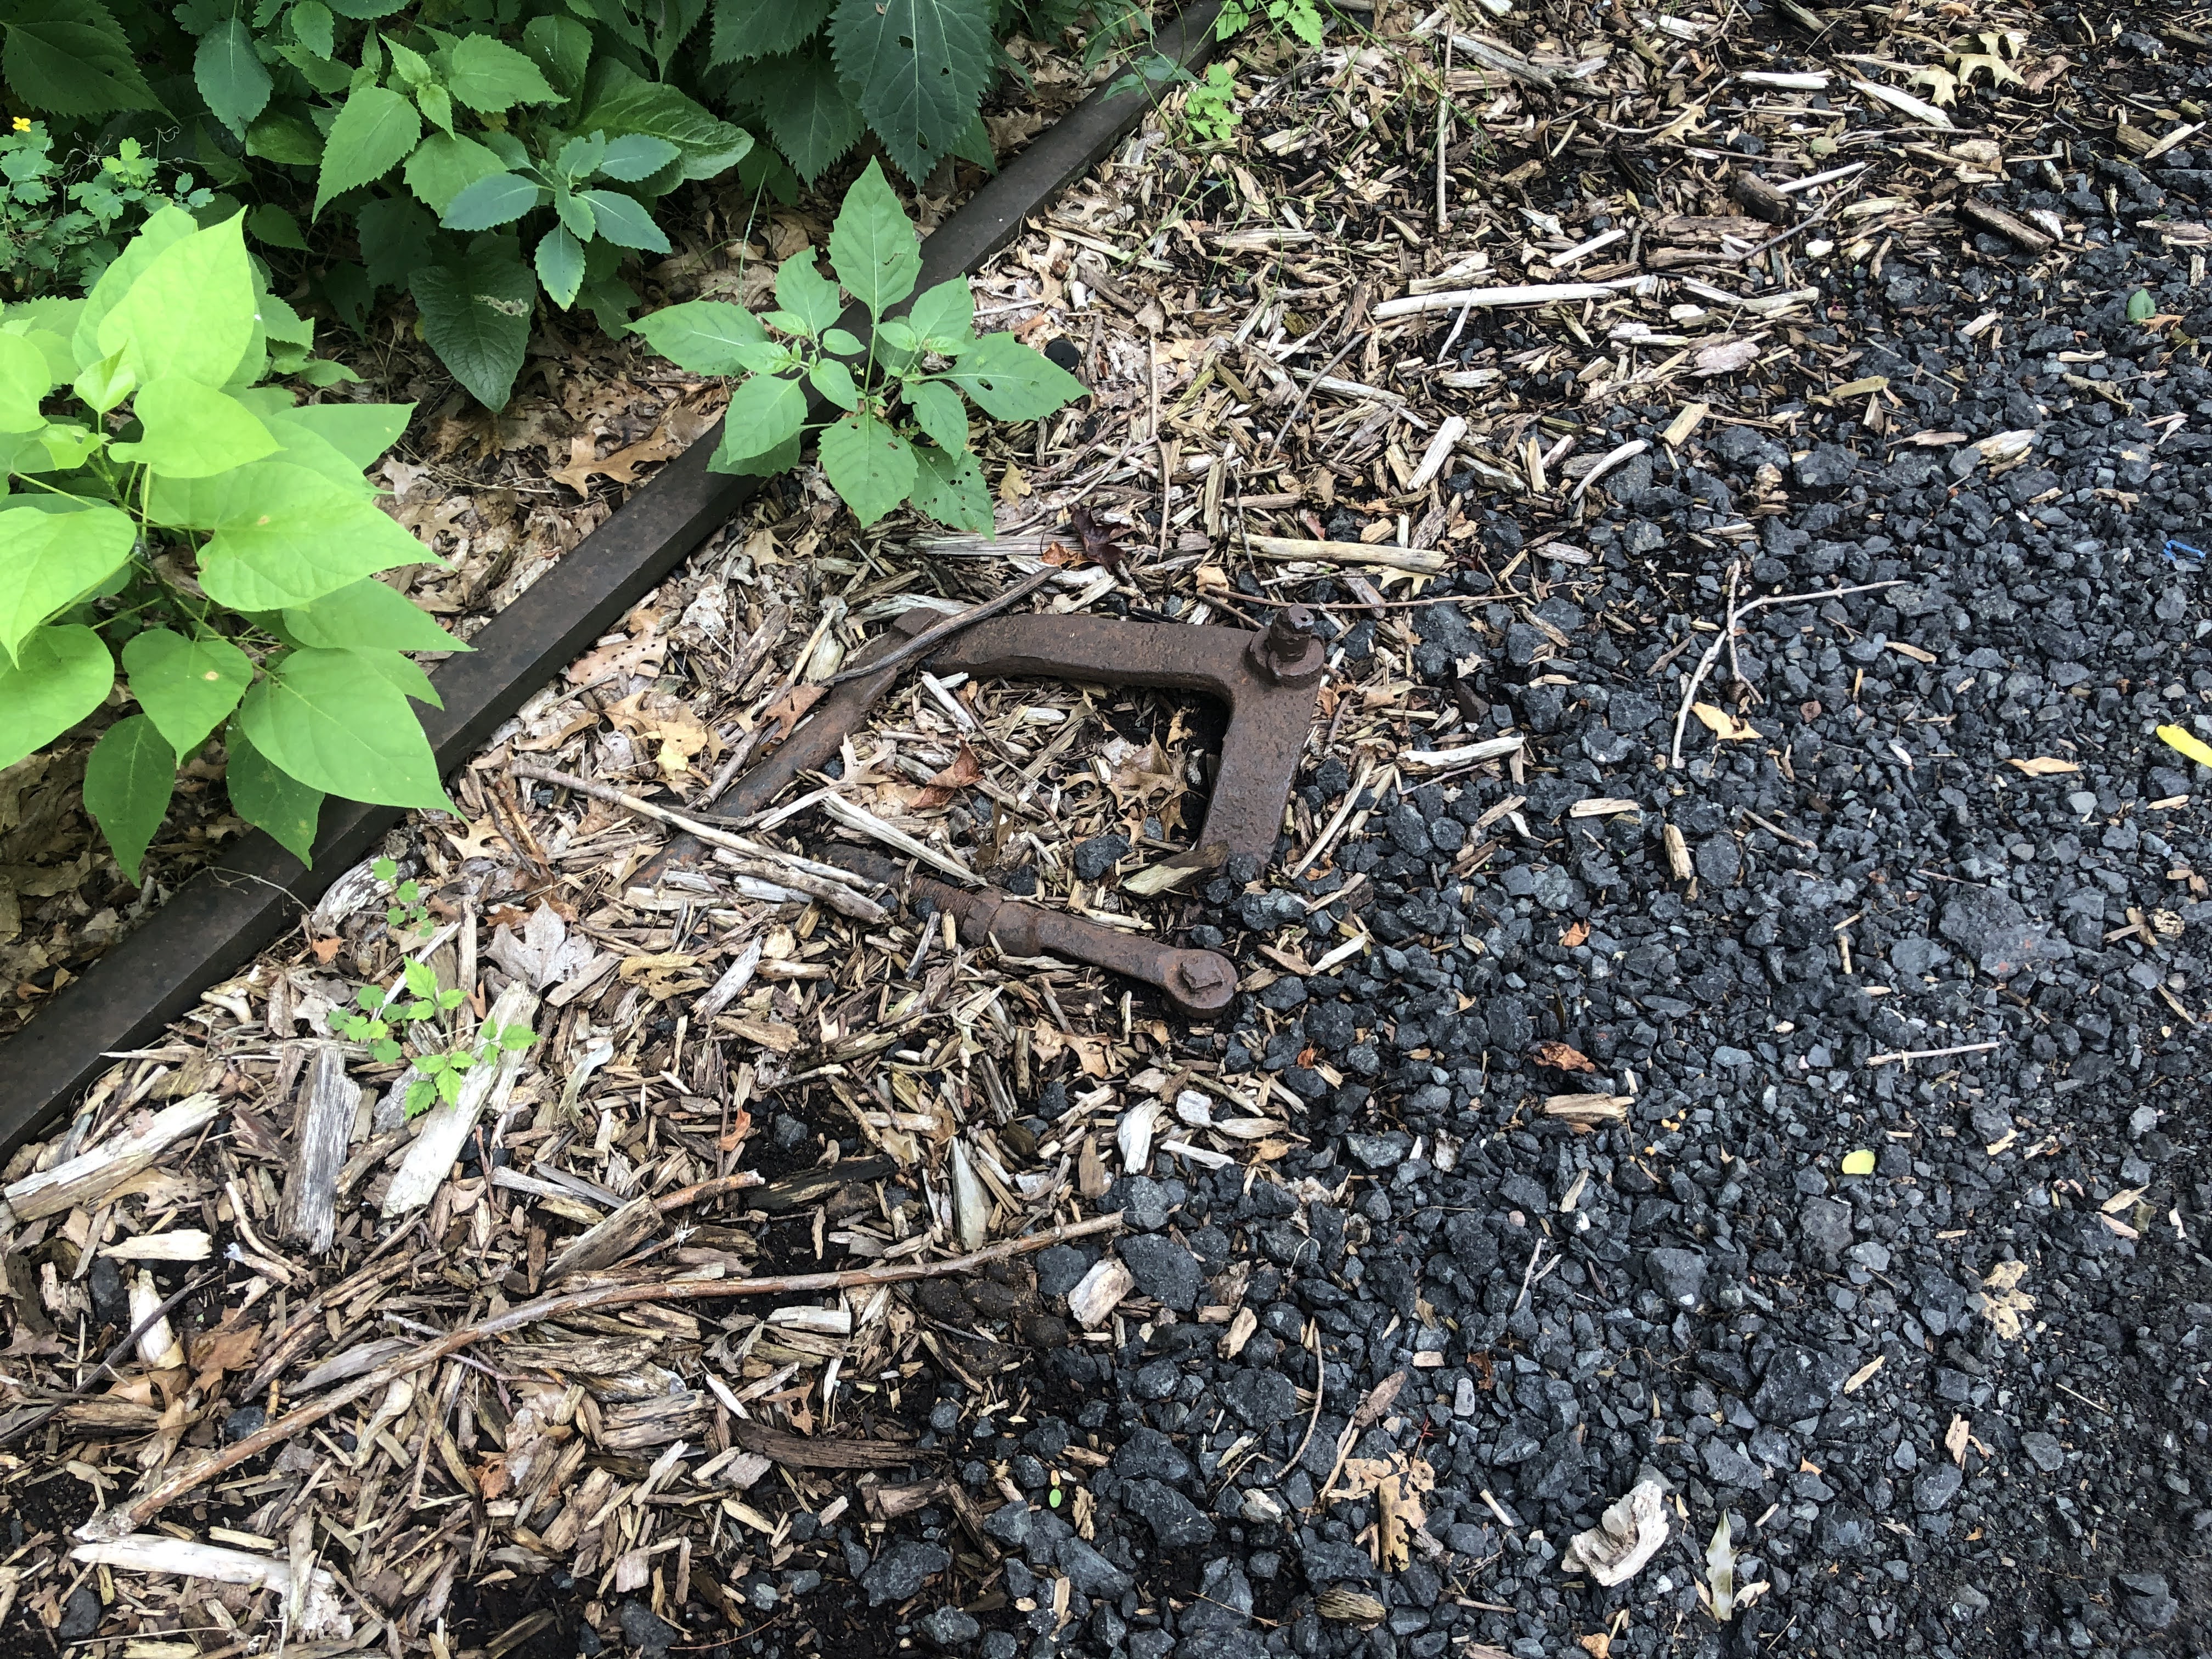
Here it is after I installed some wire piping to both ends of the air tank.


Sanding Pipes
I wanted to try adding sanding pipes, and developed an approach that is easy enough that I may just go ahead and add them to my other locomotives as well.

I ordered a few speed recorder parts to see which ones I liked, and found the Utah Pacific ones had an ingenious method for modeling the conduit. There's a small pin cast coming out of the side, and the instructions have you use a short length of wire insulation as the conduit. Size 32 AWG wire insulation is great for this, just pull the stranded wire out.

For the sanding lines, I used a similar approach. I have spools of 32 AWG wire for installing decoders. This wire has silicone insulation (doesn't melt back when soldering), which is slightly thicker than the insulation from the standard 32 AWG wire that I am using for the speed recorder.

I pulled the stranded wire out, and then inserted .010" phosphorous bronze wire about an inch into the insulation.

The portion with the wire is bent to shape, with a small section sticking out of the insulation, simulating the smaller pipe as on the prototype. 


This is then glued with AC at two points on the back of the brake hanger.


All ready to go!


I then thread the flexible portion through the bottom of the chassis, and found a place to glue it inside as well. I then installed the wheelsets for the final bending and trimming of the hoses themselves.

Additional Details
If you look closely at the water tank, I added a sight gauge, as well as an MU stand cover for the Steam Generator Tank fill. There's another one on the opposite side for the Engine water filler.

Parts Used in this post:
The model is a Life-Like Proto 1000 (now Walthers Proto) RS-2

Amazon
This is what I use for installing DCC decoders since the insulation doesn't melt

Cal Scale (order direct from Bowser)
190-430 Diesel Under Floor Bell (2)

Custom Finishing Models (order direct)
147 ALCO Handbrake Chain Guide
226 Fueltank Sight Glass

Detail Associates (find on eBay)
1504 MU Stand - EMD Intermediate, Double
2210 Safety Chain - Black, 40 links/inch 

Tuesday, July 28, 2020

What else am I working on? Phones

I've slowly been collecting the parts needed for installing a phone system for the Agent. I'll use this for the crew at Whiting St to call for their work, and also so I can call in as an industry for switching requests. The only part I'm lacking now is the vintage footswitch for the dispatcher. I can use a more modern one temporarily.

I've been working with Seth Neumann of Model Railroad Control Systems who I highly recommend. 

Here's a preview, with more details once I get it fully up and running.


Friday, July 24, 2020

Prototype - Phone Boxes

There's a thread on the NHRHTA forum (actually, the second one in probably 6-10 months) on phone boxes. My buddy Joseph informed me that there is one still up in Granby. So here it is.


Or not!

Update: Former signalman Al Goff informed me that the round concrete box was for batteries, and the connections inside the box were for signals. So while this looks like the same size as a phone box, apparently it was not. More in a future post...

And measurements in case you want to model one...


There is a pretty long stretch of track still buried next to the trail, including a lot of rodding (signals? interlocking?).


The location is interesting since it's couple tenths of a mile north of the station rather than at the station itself. Maybe this is where the freight house was? I'll have to dig up some maps.

Thursday, July 23, 2020

Modeling NY/YN Freights - DERS-2b (RS-2) 0502 and 0503 - Part I

As I have mentioned, Chris has documented how he modified his Proto 1000 RS-2 model, and I've followed much of the same process. But I'll supplement his info with what I've been doing differently.

Pilot Grab Irons
One of the challenges he pointed out are these pesky curved, upside down, angled, Alco pilot grab irons. He used the ones from the Kato RS-2, and I have enough of those to use if I want, but they are otherwise sold out and I think it's highly unlikely Kato will be doing another run of the RS-2. Atlas has some better ones on their RS-1 models, so those are an option now as well. I haven't checked to see what they have in stock.

But I wanted to give a try at bending them from wire by hand. As you can see, I've already scraped off the molded on grabs and uncoupling lever (could probably use a little more cleanup).


To start, it looks like you're making a paperclip.


I measured the bent part against where the molded-on one used to be and marked with a Sharpie where I would start the next bend.


That makes the basic oval.


Then you just need to bend the legs...


The tool I'm using is a needle holder, like these. They are designed for holding a suturing needle. The main reason I like them is they require much less effort to release than sprung tweezers. You squeeze them to lock them, and then squeeze them to release. I got them to use for installing grab irons on models, since I don't send them flying with them.


I have a pair of beading/jewelry pliers (like these), which have circular ends for bending wire. However, in this case I found that the needle holder had a smaller tip. Even better, once I marked where I wanted the bend to start, I could lock them on the wire. The downside is that it will make a sharp bend at the edge if you aren't careful. I found I could rework that by locking it with the curved part facing the sharp bend, and use another pair of needle nose pliers to squeeze it over the curve.


The sharp bend, however, is exactly what we want to make the legs.


My pair of beading pliers has a nice flat section that I used to both flatten the bent grab, and angle the legs.


One down, and 3 more for this locomotive. I'll need to make these for at least five other locomotives, since they are used on the S-1, S-2, and the early RS-3 locomotives as well. Here's another look at the finished one.


As good as these look, I should add the nbw castings and model the attachment point as well, something that wouldn't be necessary with the Atlas ones. However, it also looks like the S-1 and S-2 will require slightly smaller ones, so the RS-1 grabs might not fit all of the models anyway. More importantly, I think being able to make more complex bent wire parts like this is beneficial for other projects, so it's worth the practice I think to do these myself.

I'll get to the rest of the pilot in a future post, let's move onto the body shell.

Nose Grab Irons, Steam Generator Stack and Intake, Door Handles
I had to rebend the Cal Scale grabs for the larger grab irons on the nose of the RS-2, as seen here:


While I'm happy enough with them that they will stay, I could have made more accurate ones by bending them myself. I did flatten the one on the right because it was not a drop grab on the prototype, and repositioned it since the dimples were positioned for a drop grab. I drilled out the dimples anyway, so I could fill them with .020" styrene rod.

I painted the grab irons with a black Paint Pen. It makes it super easy to paint or touch up the grab irons (and the horns and brake wheel).


It has a broad tip and a fine tip, I'm using the fine obviously. I got it at Michaels. I think this is more of an ink than a paint. I did try painting the grab irons first, but that under heavy handling it rubbed off. I haven't had a problem with that with the normal handling since they've been installed, though. A true paint pen/marker might have been a better choice.

A few other visible details:
The brake wheel is from the Athearn RS-3. It looked better than the P1k one.

I scratch-built the steam generator intake by sandwiching a few pieces of styrene and filing the edges. I could have used the same Custom Finishing ones that Chris did, but I only had one of the correct size,  and once I had made one, I figured I'd do both the same way. I hand-painted it (along with the lift rings and door handles) with Tru-Color New Haven Warm Orange. It's not a perfect match, but very close and will blend in fine with weathering.

The steam generator stack is also from the Athearn RS-3. I used it because it's styrene, it has two attachment pins, and already matches the curve of the hood. It was a little tall, so I installed it, marked it, then cut/filed it shorter. I simply took them (along with the brake wheels) from the undecorated models I already had, and will order replacements. It's hand painted with Citadel Chainmail. 

You can also see the Cal Scale door handles. I think these are from their forthcoming RS-3 model. They are tiny and fragile. Also, at least one was damaged in each package I got, and there are exactly the right number in the package for the RS-2. So it took 3 packs to get enough for two locomotives. It really wasn't worth getting them to replace the damaged one, since I knew I was going to lose a couple anyway. 

Radiator Fans
Subtitled: More Fun Using Power Tools On Your Models!

I also decided to try KV Models radiator fan screen. This came about in part because I have three RS-2 models, and found that I probably only need two. So I had an extra shell...

I found a 5/8" paddle bit is a perfect fit.


The biggest challenge, of course, was keeping it straight. I drilled in short pulses to not go too far, and also so it wouldn't start melting the plastic. If you look carefully, a little less than 1/4 of it bent out slightly. Probably fixable, and I may end up detailing this one eventually anyway since I didn't kill it.


In the end, I wised up (chickened out) and opted for a 1/2" bit (that was the next smaller one I had on-hand), along with cleaning up the remainder with the Dremel. The small drill bit was used to drill the initial guide hole.


Oops, I didn't use the styrene spacer they mentioned on their page...

I used Citadel Boltgun Metal for the fans, the black paint pen for the fan supports, and brush painted the grill with the Tru-Color paint, then applied a little Pan Pastels for weathering.

I do wish Walthers would release a new road number for this model, but it's great that the two Life-Like originally chose are the assigned numbers that Chris (0510) and I (0503) need.

Classification Lights
For the classification lights, I used the Cal-Scale ones, which are a perfect match for the New Haven. The struggle was finding jewels/lenses that fit. I found the best option was the Custom Finishing 1mm ones. MV had some that were designed for it, but they are virtually impossible to find now.

The second issue I had, though, was whether to light them or not. By rule, the NH did not light classification or marker lights except at night. So I decided that I didn't need to. But the problem is, the jewels are still very bright because of the reflective coating on the back. Utah Pacific sells some without it, but they were too large. I tried finding another source for jewelry making, but was unable to do so. 

Instead, I sanded the reflective coating off of the back. I also drilled out the holes in the hopes that light would shine through just a little bit, but it doesn't seem to. So I'm not sure it came out exactly as I'd liked, but I do think it's better than the bright, reflective jewels as packaged.

I've seen photos of marker lights on the RS-2s painted black, as well as those painted the Warm Orange of the hood (on the delivery units). I liked the contrast of the black, and used the paint pen to color them. I might decide to redo one of them in the Warm Orange.


Anyway, that's enough for now. Normally I might have split this into several posts, so I need to go do some more work so I'll have something for the next one!

Parts used in this post:
The model is a Life-Like Proto 1000 (now Walthers Proto) RS-2

94111 RS-3 Brake Wheel
94112 RS-3 Steam Generator Stack

Cal Scale (order direct from Bowser)
190-280 Marker Light Small Switcher and Hood Unit
190-512 Small U Bolt .012 Wire
190-731 Door Handles
 
Citadel Colour Paint (available at local Hobby/Role Playing Gaming stores)
Boltgun Metal (now Citadel Base Leadbelcher)
Chainmail (now Citadel Base Ironbreaker)

127 1mm Jewels/Clear 

Details West (order direct)
AH-174 Air Horn "Wabco" Type 'E' Single Chime

KV Models (order direct)

Tru-Color Paint (available at local Hobby/Model Railroad stores)
TCP-036 New Haven Warm Orange