Showing posts with label ballast. Show all posts

Wednesday, February 19, 2025

Fiddling

Progress is one of those things that I think we all struggle with from time to time.  Tom Jacobs has his "hour a day" mantra and Chris Adams has "do one thing." Similar approaches are great ways to keep things moving.

My approach is similar, but in an ADHD bent rather than an OCD sort of way.  What's the difference? Chris and Tom get more things completed.

Rather than try to force myself to do those things that I should be doing, I've gone back to doing whatever I gravitate to instead. Lately that has been fiddling around with freight car kits. Cleaning flash off resin kits, drilling holes, etc. are great mindless things when my brain has had enough, but I want to keep busy. That has led to assembling some bodies and doing some of the detail work when a particular kit captures my interest. 

This leads to lots of projects in progress, but my theory is that they will all get finished eventually.  Progress is progress, after all. There is a bit of method to my madness, though.  When I start doing a particular task, such as cleaning flash or drilling holes, it's easy to just keep moving forward with that task.  Thus, pulling several kits (often with a theme) and completing the process on several.

In addition to getting to see the cool kits I've picked out over the years as important to my layout, right now it's a better approach for me.  Changes in work has left me more mentally fatigued than short on time. These more mindless tasks are good distractions, but also let me give my brain a rest.  The reality is, for me anyway, that my brain becomes more productive and finds solutions best when I don't think about them. So this approach ends up being helpful for my work and my modeling. The apparent chaos can be a good thing.

The big thing here is that, as a hobby, it's supposed to not only be fun, but engaging. It's a distraction from the rest of life, and a better one (at least for me) than just watching TV or videos online (I've done way too much of that already).  It's also a way of accomplishing things that are uniquely you.  Leaning into my nature has already made me far more productive, and I have already found solutions to some of the things that have been holding me back on those things that I should do.  As a result, I do want to complete a number of these works in progress, and get to a few critical things to get the layout fully operational again, and set up in a way that I can be prepared for regular sessions. And scenery.

So what have I been working on?

Rapido 44-tonners


Various Box Car Mini-kits and Kitbashes

Ballast and Cinders experiments

Painting and Weathering Ties Experiments

Resin Gondola Kits

Resin Reefer Kits

Reorganizing

Wednesday, February 9, 2022

Revisiting my Ballasting

I originally ballasted and scenicked the area around the west side of town and the yard based on photos like these:


The ballast is the stone (basalt) that I expect, a relatively dark gray. The ground around it is lighter and looks like dirt.


The thing that bothered me about this, is that dirt turns into mud very easily and isn't typically a good choice in a yard, or immediately around the tracks. I know there are plenty of areas where this is appropriate, but it didn't seem like the yard and running through New Britain is one of them.

But color photos, even those from a few years later, tell the true story. It wasn't dirt, but cinders. In fact, I had expected this, but since the ground was lighter than the stone ballast in the black and white photos, I thought it was just dirt.


For some time, I've been debating what I think I should do (if anything) regarding the ballasting and ground cover I had done before.

I had some more recent posts here and here regarding ongoing experimentation with ballasting. The problem is, they look quite different (and better) than what I had done earlier.

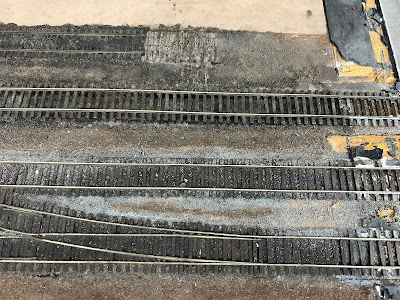
In an unrelated project, I wanted to adjust the width of Main St. and Elm St. In the process, one of the tracks popped up due to contraction once freed from the Main St. crossing:


Since I had to clean the ballast from around that track, I started cleaning some more. (You can still see the white film on the base that has been occurring when I tried using grout on my layout.)

In the end, I have removed all of the ballast and most of the ground cover from west of Main St. I will most likely do the same for New Britain Yard, but not until I am sure that I have finalized my ballasting process.

As good as the last few experiments went, they still weren't quite there. So here are some new ones:


These results are much, much closer to what I'm trying to achieve. I'm also working through many options for weathering the ties and rail, since I think the colors and textures all have to work together, from the ground cover to the rails.

I'm still working on the cinders. What I have is too large and/or too dark, but I'm getting closer.

The biggest key to the new look above is a blend of multiple sizes of ballast. Most of it is the primary size I've been using, but there is some of one size smaller and one size larger mixed in. I've also included some ballast tinted brown, which doesn't come through on the photos as much as it does in person, plus some cinders.


I will provide further details once I dial in the cinders mix and the coloring approach for the ties and rail. I have trackwork and wiring to do first.

Monday, September 27, 2021

Pictures from work (CNZR)

I haven't done a whole lot of rail fanning, but when I have, it's often literally "rail" fanning, since there aren't all that many trains running near me. Now that I'm working at CNZR part time, I have a lot of opportunity to do so.

Here's a shot at the start of a Sunday morning work day at Tobey Rd looking toward Hartford.


One of the things you'll notice on a lot of layouts is that the right of way, and scenery around it, is often very uniform. This is true to some degree on a well maintained mainline, especially back in the '50s and earlier. But you'll otherwise find that it's quite variable, in part because of the terrain around it.

Looking the other way, and a little up the line (past the current construction) you'll see that there are a lot of tall weeds. It's hard to tell, but this is in a drainage ditch. The track here is actually in a bit of a depression, you'll note that the ground on both sides is higher. 


If I move up to where that line pole is, you'll see that the weeds are much less, and the ditch has a lot of small puddles of water. 


On the opposite side, looking back towards Hartford again, this side has almost no vegetation (it's in shade all day), It's just dry, but still has a drainage ditch (also dry).


Looking away from Hartford again, the pile of newer ballast is where the other photo was taken. That ballast is there for the ongoing construction, but it also highlights that the scenery also tells a bit of the history of the railroad. 


That's often most clear in things like the ties, in this case where there are a lot of well-worn ties, with some replacements. Again you can see how the ballast varies quite a bit.

One last shot looking toward Hartford.


For earlier eras, we have to rely on photos for details like these. If you're modeling railroading today, though, I highly recommend getting out there and taking a look where you can (safely and legally). I will say that in pictures of New Britain in my era, the track and right of way are much better maintained. This sort of interesting track and scenery almost makes me want to model a later era. 

Almost...


Tuesday, October 20, 2020

Ballast Again...

 ...for real this time!

A couple of years ago John Grosner passed along a switch stand he had. The thing is massive (I think I found that they weigh around 800 lbs). 

A month or so ago, Joseph stopped by with some ties for the switch stand. After (mostly Joseph) attempted the first spike, we decided drilling a pilot hole was the way to go. I can't imagine how millions of ties were laid by hand.

He had previously found a set of targets for me, which I sanded, removed the reflective tape, and repainted with Rustoleum safety red, safety green and white.

Yesterday I collected some ballast from the (long-abandoned) track at Cook's Quarry to finish it off.


At some point I'll find a lantern that fits. Although it was common for the NH to use them without lanterns as well. I usually have folks enter the back for open houses and ops sessions, and it points the way. You can see how dark the NH trap rock is, also with a bit of brown. This is from the same basic location where I collect ballast for the layout.

Tuesday, September 1, 2020

What else am I working on? Ballast as usual...

On a recent trip to Plainville I was there at just the right time to catch the Pan Am train on the old Highland Line:


I decided to head to Forestville to see if I could catch it there. I didn't, because it parked a little before it got there for some reason. However, thinking about it this would be the train that would interchange cars in Plainville, not work the industries on the Highland and lower Canal Line. So for whatever reason they just weren't ready to do their work. They would be on the other end of the train if they were done, to head back to the Springfield Line in Berlin. As it turns out, Jess and I saw a much longer one a a couple of days later sitting at Cook's Quarry on the border of New Britain and Plainville. It was also just waiting there at the time. Being a single-train, single track main it's odd that it was waiting there. If it needed clearance for the Springfield Line I would expect it to be waiting right at the wye.

In any event, in Forestville I was looking at a stretch of track and took a few pictures for reference for ballasting:


I took a closer look at the darker material and found flecks of coal. It's actual cinder ballast!


So I looked around and found a discarded bucket and brought some home:

Here are a couple of experiments with it after I sifted it:


And another section just between the rails with a bit of a different mix:


In addition to trying to develop a mix for cinders and dirt I like, I also think I need to mix some different sizes for a less uniform look than my earlier experiments. Especially along the edge where the maintained stone ballast meets cinders and dirt. Another issue is combating the fact that the material darkens when glued, which tends to make cinders by themselves too dark.

Another thing I'll work on adding are dried leaves in some areas, since I'm modeling early November. 

A little later I also stopped by Tilcon to replenish my supply of stone ballast. The process is simple. I got a set of 5 stacking screens, with 120, 130, 150, 170, and 1100 holes per inch. They fit a standard 5-gallon bucket. You put the one with the smallest holes (1100) on the bottom, and progressively larger holes on top of that. I put a small shovel full of material in the top one, then shake the bucket to screen the material. As I fill containers, I label them with the two screens, such as 130/150, meaning the material passed through the 130 screen, but not the 150.

Here's the set up at Tilcon:


At Tilcon, you drive in and weigh your vehicle. I then go to the screenings, and start sifting. I spent about an hour today, and refilled my supply pretty well.

The cost?


$1.41 for 5 sizes of material. The screenings that go through the 1100 screen is basically dust and is fantastic for dirt and cinders in HO. For ballast my primary size is the 130/150. For some reason the size that is always the least that I get is 170/1100, but I don't seem to need much of that either. 

Saturday, February 29, 2020

New Haven Ballast

This is the ballast chart for the NH Railroad, the NHRHTA forum requires me to pay for a VIP account to post the high resolution version...

The ballast is different over different parts of the system. On the Highland it appears a fairly dark gray as I documented in this post.

In this post, I covered my latest approach in ballasting the layout, using real stone ballast from the same ridge in Plainville that the New Haven used. I think it's a very good match. There is a little brown. It's magnetic, so there's some iron in in, and I think that's what gives it the brownish tinge over time. I might experiment with a brownish wash for that effect.

In photos of the Shoreline, there is more brown in the color of the ballast. So when we do Chris' layout I'd like to go sift ballast from the Saybrook Tilcon quarry instead.

Here's the New Haven Railroad Ballast Chart from 1917, updated through 1921:


And this one is updated through 1959:


They are too large for my scanner, so I just had to take photos, so sorry for the quality of the photos.


Thursday, December 19, 2019

Tweaking the Process - Ballast

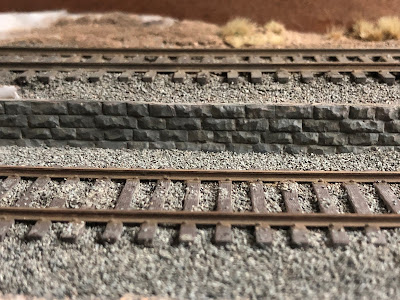
So this started because I wanted to try the Chooch cut stone retaining wall for along where Track #5 has to be elevated as the helix is declining so we can leave cars there.

When picking up supplies at Roger's, I noticed the Woodland Scenics Shaper Sheet, which ended up being different than I expected. It's a stiff foil sheet with some sort of felt/fabric material on top. It's intended to be used with plaster cloth, and binds to the plaster. But I wondered if I could use it in this location and put it under the track too, which covers the slots in the Woodland Scenics risers I used to keep the track level. 

So I glued down a scrap of track and ballasted it using the ballast I sifted at Tilcon in Plainville, from the same area that the New Haven got ballast from Cook's Quarry, and some dirt from New Britain.


It worked OK, although there were a lot of fibers that stick up through the ballast, and I decided to skip using it under the track. Except in one location where there wasn't any foam support, so I wouldn't need to use so much ballasting material to bring it up to level.


At this point, it was worth seeing how the ballast would look.


Which led me to realize that I hadn't painted the track first like I usually do so I used a Paint Pen for the initial layer of color, before the usual Pan Pastel weathering, and used the same technique on the wall.


Of course, now I wanted to see how the lower track and ballasting would look...


I need to add a cap to the stone wall.

The process is coming together nicely, and finally seems to be fairly repeatable.

For the rest of the area I went back to spraying all of the track with the Rustoleum Camouflage paint (only to find that it melts the Woodland Scenics Risers, but not enough that I had to take anything up).

I then add a thin layer of ballast, just enough to cover the area, and wet that with Future. I then sprinkle additional ballast on top of that, enough so the Future doesn't soak through. Once dry, I remove the loose ballast, then wet the area with Future and repeat with the same approach. This builds up the ballast in layers, but the top layer isn't saturated in the Future (or other glue) so it isn't darkened or have a film over it.

I use a very small pipette to apply the Future, and primarily rely on capillary action to draw it between the ties. Where I need to, it's narrow enough that I can drip future between the ties without getting it on top of the ties. If I do it's not a big deal. The goal is to avoid having a glue film on top of the ties or the ballast.

For the ballast on top of the ties, I use the paint pen to color the tie (which also works to cover any locations the Future did get on top of the ties), then sprinkle a few pieces of ballast here and there. Once that is dry, I use a Raw Umber Shade or Extra Dark Pan Pastels for the ties, then a Neutral Gray in places to lighten them up. In my era, it looks like the majority of tracks are well maintained and the ties are not a faded silver-gray like they are today.

For the rails, I used the Paint Pen (Woodland Scenics Railroad Tie Brown, if I recall, but the color is really irrelevant because the Pan Pastels provides all of the color) to wet the rails, then after letting dry slightly, I used Raw Umber Pan Pastels to first stipple (so it won't wipe off too much paint), and then "paint" the rails by sliding the brush down the rails to smooth out the look.

I then use the Raw Umber Extra Dark and Black to darken the entire area between the rails. All of this should be somewhat random yet consistent.

I'm very happy with the way this came out, compared to my earlier efforts (which means half the layout is going to look much better to my eye). 

The stonework used the same technique in wetting with the Paint Pen, then a variety of Pan Pastel browns, blacks, and grays. 

I've considered not using the Rustoleum, since the color really isn't going to show through after the later coloring. But I find that it gives a little more tooth to add the additional layers of paint and weathering.

Here's the wider area in progress. This is after another layer of ballast, before brushing and/or vacuuming the excess.


If you start with a clean vacuum you can reclaim your ballast if cost is an issue. For me it's a question of time, not money. The sifting screens cost less than $70, and my ballast costs me less than $20.00/ton. So I highly recommend sifting your own if you can. 

While it seems like this takes a long time, I tend to work in small sections. I can do a layer of stuff over a foot or two in about 10-15 minutes, then move on to other things while it dries. I have additional work to do before I'm ready to do this whole area (primarily figuring out what to do with the backdrop), but I'd like to do this scene because it leads into the layout and is just scenic.