Tuesday, December 31, 2019

Online Industries and Through Consists

I have most of the issues of Along the Line from 1945 through 1948. A number of these issues have articles on industries on the New Haven Railroad. This is a great source of information about industries, and can eventually help me flesh out waybills for through freights.

Some examples:
The December 1945 issue is largely focused on discussing industry on the railroad, and attracting more, including an article for the newly formed Department of Industrial Development. A particularly useful article shows several new ads highlighting some of the companies on the New Haven Railroad:

Eastern Massachusetts

American Tread Company
Baker's
Bendix
Bethlehem Steel
Bird
Curity
Dennison's
Douglas
Firestone
Fisk
Glenwood
Good Year
Hercules
Ivory Soap
Pepperell Fabrics
Plymouth
Reed & Barton
Revere
Rexall
Rinso
Ruberoid
Walk-Over
Wamsutta

Eastern CT

Aralac
Armstrong Tires
Arrow Shirts
Babock
Bigelow Weavers
Cheney
Colt
Ebco
Erector
Fuller
International Sterling
P&W
Packer's Tar Soap
Pond's
Royal
Russwin
Sargent
Silent Glow Oil Burners
Silex
Stanley
Thermos
Underwood
Uinversal
Williams
Winchester
Rhode Island
American Wringers
Ashaway
Anaconda
Beaded Tip Shoe Laces
CB Cottrell
Corning
Crown Zippers
Davol
Esmond Blankets
Fiberglas
General Cable
Good Year
Gorham Sterling
Grinnell & Co
Hope
J&P Coats Threads
Kennescot Wire & Cable Co
Lonsdale
Nicholson USA
Seidner
Taft-Pierce
Washburn Wire

Western MA

American Optical
American Woolen Co
Arrow Shirts
Cluett
Columbia Bicycles
Eagle A Papers
GE
Gilbarco
HB Smith Cast Iron Boilers
Johnson Wire
McCallum
Peabody
Pro-phy-lac-tic Brushes
Pullman
Simonds Saws
Whittall's
Whitney Carraiges
Worthington
Wyman-Gordon

Western CT

Acco
Anaconda
Benrus
Bigelow Boilers
Bridgeport Brand
Bryant
Bullard
CBS
Chase Brass & Copper
Corbin
Dictaphone
Dobbs
Knox
Lee
Malloby Hats
New Departure
Pitney Bowes
Reybestos
Sessions Clocks
Seth Thomas Clocks
Sikorski
Singer Sewing Machines
Stanley
Yale

There are a lot of industries I don't recognize. The ads were for a full-color booklet, Southern New England for Tomorrow's Industry." I'll have to see if I can find a copy, although it looks like there is one at UCONN in the Dave Peter's collection.

In addition to that, there are also occasional articles on a specific online industry. One of particular interest to me is in the July 1947 issue: and we do mean "Universal" - the oldest and the newest which is about the Landers, Frary and Clark industry in New Britain. It's a brief overview of the company and it's products, with one particularly useful bit of information: "To expedite shipments, Herbert Wyatt, Traffic Manager, ships complete carloads from the New Britain plant whenever possible. These cargoes are then broken down into spammer shipments at eight district warehouses throughout the country. Time to see if I can find out where these were located...

The June-July 1946 issue has an article on the Pond's plant in Clinton, CT. This is even better, indicating, "Only the finest and purest ingredients go into the products at Clinton, but they arrive in carload lots - tank cars of white oil from Pennsylvania, carloads of talcum powder, beeswax, stearic acid, glass jars from Washington Pa., bottles from Zanesville, Ohio, chalk from the "white cliffs of Dover." The finished products are shipped out in carload lots to warehouses in various parts of the country..."

There's also a photo with a caption that states, "The New England Transportation Company handles all Pond's l.c.l. business."

This type of information isn't always easy to come by, and while there are only a handful covered here, it's a start.

Saturday, December 28, 2019

More about Crews

For Christmas I got a new blackboard, along with some chalk pens and chalk so I can make a train/crew board for operating sessions. I'm still working out how I'd like to assign crews for ops sessions.

At RPI, there's a sign-up sheet, and it's first come, first served. A rule was later added that you had to select the next available train, since crews were cherry picking what they wanted later in the session, and occasionally there would be trains scheduled to go out, but no crews signed up. Or somebody signed up for a train later in the session, but hadn't finished their prior train by the scheduled start time.

At other sessions, I've often seen the owner assign the job based on various criteria. Another approach I've seen is at sessions that have relatively regular crews, who "own" the job whenever they are there. The idea being that it rewards regular attendance.

I think there are benefits to all of these approaches, and the "best" approach will vary not only on the layout and its operational design, but the operators involved. What I'm currently doing is trying to better understand the New Haven Railroad system, and see if I can adapt it for the layout. I also like the idea of operators qualifying for particular jobs.

I was looking through my small collection of Along the Line, the New Haven Railroad employee magazine and found an article about Crew Dispatchers in the May-June 1948 issue, followed by an article on Engine Dispatchers in the July-August 1948 issue which helps clarify the process in my era.

On the Prototype

On the New Haven, there were 12 crew dispatchers, stationed at Boston, Providence, Worcester, New London, New Haven, Grand Central Terminal, Harlem River, Danbury, Waterbury, Hartford, and Springfield. The ten Engine Dispatchers were located at the same locations, minus Worcester and Springfield, although New London was handled by the Crew Dispatcher.

What was the difference? Engine Dispatchers assigned Engineers, Firemen, and Hostlers. Crew Dispatchers assigned Conductors, Flagmen, Brakemen, as well as jobs like Head End (baggage cars), etc.

Most crews were assigned to a regular job/train and just reported to duty. If a regular job becomes open permanently or temporarily, it is put up "for bid," advertised on bulletin boards, and after the bid period, assigned to the applicant with the most seniority.

When a job was open unexpectedly, then the Dispatcher consulted the Spare Board, and works from the top of the list. This seems to have been a fairly consistent method, still in use today.

On the Model

There are several things I can do to try to incorporate this approach on the layout. I don't know if I'll actually implement it, but it's a starting point.

  1. Track Seniority. This is simple matter of recording the number of sessions/hours working the railroad. This could include both operating sessions and work sessions. The easiest method is to just count sessions, rather than number of hours.
  2. Develop Qualifications. A good approach might be for a crew member to work a particular job a certain number of times. Since I prefer two-person crews, this could be working as an engineer three times to be qualified on the job, and then perhaps switching jobs with a Conductor qualified on the job to see how they do in charge.
  3. Bid on Jobs. Regular crew can bid on jobs for which they are qualified. Rather than having somebody "own" a job, those who are qualified can bid for a job in a given session. Of those that bid for a job, the one with the highest seniority will get the job for that session.
  4. Spare Board. The spare board can be populated in the order that operators respond to an ops session announcement. During a session, when a crew completes a job, they are added to the bottom of the Spare Board. Qualified crew gets priority, with unqualified crew taking the remaining jobs. Seniority isn't important for this, just the order they respond/are available during the session.
Rather than have a new (unqualified) crew member have to shadow a Qualified crew, the jobs can be separated into Qualified and Unqualified jobs. On my layout, the Station Agent, and the Switching Conductors for the two switchers and Stanley Works would be Qualified jobs. All engineer positions, along with the through train Conductor positions (if used) would be Unqualified jobs.

The through trains would be filled by unqualified crew first, since they are the easiest jobs. For other jobs, the preference would be to assign qualified crew to Conductor positions (and the Station Agent position), with unqualified crew as engineers. Or to put it a different way, I'll have a Spare board for Conductors (Qualified) and Engineers (Unqualified), with intention of filling the jobs from within those lists.

Of course, this isn't to make the operations "work," but to more closely replicate the prototype, and perhaps to encourage crew to be more involved. It's also to help me, the layout owner, to have a core group that can help ensure that the session will run smoothly because they know the operations of the layout well. But I like the idea of rewarding those that participate more, and those that get more involved in the actual operations.

A simple spreadsheet, to record name, # of sessions, and a Qualification column for Station Agent, Switcher, and Stanley Works covers that main jobs I'll need to track. In a cell for a job, I can track the number of sessions worked that job, or another notation ("Q") when qualified.


Tuesday, December 24, 2019

More About Crew Hours

Merry Night Before Christmas everybody!

Here's a little Christmas treat from an actual ex-New Haven employee.

As a follow up to an earlier post on crew switching, I received an interesting email from Bart Hollis, who worked NX-15 from Waterbury to Naugatuck in the '60s, primarily serving Uniroyal.

He confirmed what I suspected was the "norm" for local freight crews of the era:

"It was noted as being what we called an outlaw job. That is 16 hours was normal. As you correctly pointed out, if you worked 16 hours, you had to have 10 hours rest. You also correctly indicated that it put the job back two hours for the next day. Not considered acceptable. The workaround was to claim 15 hours and 59 minutes on duty time. We got paid for 16 hours, but could start work in 8 hours. Those 8 hours included travel time, shower, supper, breakfast and pretty much a short nap. By Friday, we were pretty much exhausted, but well paid.

This policy was used by the crews of any of the locals I worked. We never claimed 16 hours unless it was to "punish" the trainmaster. I doubt you'll find this in any of the official company books, but it was universal on the NH."

This also reminds me of another comment from somebody at the Chicago clinic, that if a crew thought they could finish up the day in less than 8 hours, they would hurry up and do so. Since they were paid by mileage (essentially, for "the job"), they got paid the same if they did it in 6 hours or 8 hours. But if it was going to take longer than 8 hours, then they would take their time and stretch it to 12 (outlawing in their era), or in my era, almost 16 hours. This is because they would be paid overtime for hours worked over 8, and if they were going to have to "work late" then they might as well make it worthwhile. 

In my case, the local (usually HDX-5 from Hartford to New Hartford, but later NX-25 from Hartford or New Haven), comes through the layout twice. Although I'll should push the return back farther. But it does provide additional operational options for Chris on the Valley Local.

Bart also commented on the rates of pay:

"Also, by my time there, there were four pay rates, at least for train crews. In order of rate, highest first: Yard which was solely within a single yard limit, Local which was listed in the assignment book as such, Through local which was a through freight that made three or more stops for pickup or setout, and Through which was a symbol train that made two or fewer stops during it's trip."

This is interesting, because it provides a rate of pay for a train like NY-4/YN-3 Cedar Hill to Holyoke and return, but also did some switching on the way, rather than a local freight.

Thanks for the info, Bart!

Thursday, December 19, 2019

Tweaking the Process - Ballast

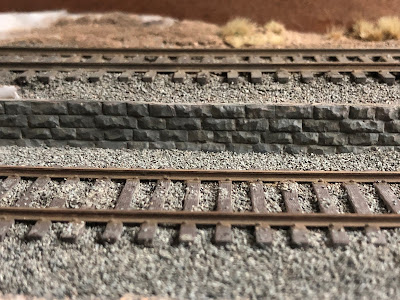
So this started because I wanted to try the Chooch cut stone retaining wall for along where Track #5 has to be elevated as the helix is declining so we can leave cars there.

When picking up supplies at Roger's, I noticed the Woodland Scenics Shaper Sheet, which ended up being different than I expected. It's a stiff foil sheet with some sort of felt/fabric material on top. It's intended to be used with plaster cloth, and binds to the plaster. But I wondered if I could use it in this location and put it under the track too, which covers the slots in the Woodland Scenics risers I used to keep the track level. 

So I glued down a scrap of track and ballasted it using the ballast I sifted at Tilcon in Plainville, from the same area that the New Haven got ballast from Cook's Quarry, and some dirt from New Britain.


It worked OK, although there were a lot of fibers that stick up through the ballast, and I decided to skip using it under the track. Except in one location where there wasn't any foam support, so I wouldn't need to use so much ballasting material to bring it up to level.


At this point, it was worth seeing how the ballast would look.


Which led me to realize that I hadn't painted the track first like I usually do so I used a Paint Pen for the initial layer of color, before the usual Pan Pastel weathering, and used the same technique on the wall.


Of course, now I wanted to see how the lower track and ballasting would look...


I need to add a cap to the stone wall.

The process is coming together nicely, and finally seems to be fairly repeatable.

For the rest of the area I went back to spraying all of the track with the Rustoleum Camouflage paint (only to find that it melts the Woodland Scenics Risers, but not enough that I had to take anything up).

I then add a thin layer of ballast, just enough to cover the area, and wet that with Future. I then sprinkle additional ballast on top of that, enough so the Future doesn't soak through. Once dry, I remove the loose ballast, then wet the area with Future and repeat with the same approach. This builds up the ballast in layers, but the top layer isn't saturated in the Future (or other glue) so it isn't darkened or have a film over it.

I use a very small pipette to apply the Future, and primarily rely on capillary action to draw it between the ties. Where I need to, it's narrow enough that I can drip future between the ties without getting it on top of the ties. If I do it's not a big deal. The goal is to avoid having a glue film on top of the ties or the ballast.

For the ballast on top of the ties, I use the paint pen to color the tie (which also works to cover any locations the Future did get on top of the ties), then sprinkle a few pieces of ballast here and there. Once that is dry, I use a Raw Umber Shade or Extra Dark Pan Pastels for the ties, then a Neutral Gray in places to lighten them up. In my era, it looks like the majority of tracks are well maintained and the ties are not a faded silver-gray like they are today.

For the rails, I used the Paint Pen (Woodland Scenics Railroad Tie Brown, if I recall, but the color is really irrelevant because the Pan Pastels provides all of the color) to wet the rails, then after letting dry slightly, I used Raw Umber Pan Pastels to first stipple (so it won't wipe off too much paint), and then "paint" the rails by sliding the brush down the rails to smooth out the look.

I then use the Raw Umber Extra Dark and Black to darken the entire area between the rails. All of this should be somewhat random yet consistent.

I'm very happy with the way this came out, compared to my earlier efforts (which means half the layout is going to look much better to my eye). 

The stonework used the same technique in wetting with the Paint Pen, then a variety of Pan Pastel browns, blacks, and grays. 

I've considered not using the Rustoleum, since the color really isn't going to show through after the later coloring. But I find that it gives a little more tooth to add the additional layers of paint and weathering.

Here's the wider area in progress. This is after another layer of ballast, before brushing and/or vacuuming the excess.


If you start with a clean vacuum you can reclaim your ballast if cost is an issue. For me it's a question of time, not money. The sifting screens cost less than $70, and my ballast costs me less than $20.00/ton. So I highly recommend sifting your own if you can. 

While it seems like this takes a long time, I tend to work in small sections. I can do a layer of stuff over a foot or two in about 10-15 minutes, then move on to other things while it dries. I have additional work to do before I'm ready to do this whole area (primarily figuring out what to do with the backdrop), but I'd like to do this scene because it leads into the layout and is just scenic. 

Tuesday, December 17, 2019

An Interesting Operation

Was looking through some Kent Cochrane videos of the Highland Line, that I hadn't watched in a while, and I had forgotten about this interesting train, in western New Britain heading to Plainville.

Just your average passenger train c1953 with a couple of RDCs

aaaannnd a heavyweight baggage car !?!?


That will be a fun one to throw into a session at some point...

Thursday, December 12, 2019

Operations - Freight House

I talked about freight house traffic here, here and here in the past. In the process of compiling that information, I have come to the conclusion that the freight house would be "set up" in the same way each day, to accommodate these regularly scheduled movements.

Among my collection, I have a Traingram from 1951 that just happens to talk about a temporary order for freight house movements, and it seems to imply just that.

So for autumn 1951 sessions, I know exactly how the freight house will be set up for outbound traffic.

Tuesday, December 10, 2019

Crossing Gates

As an addendum to the Crossing Shanties series, I'll need to look at how to model the evolution of the crossing gates in New Britain.

The line from Smalley Street to Curtis Street (the entire layout) received new automatic gates flashing lights in Summer 1952. The Employee Timetables note where they are in use, and in April of 1952 only East St. and Wooster St. had them (and had since before 1946), but by October '52 the entire line does.

In the photos I posted for the Main St. crossing shanty, there is no signal box in the Cochrane video, but in the later photos one has been added. Presumably for the crossing gates.

But what's interesting is that the Elm St. and Main St. installations aren't your typical crossing gates. In this shot looking south on Elm St in 1956, the manual gates are still present, and what looks like the base of a typical automatic crossing gate. There are no flashing lights, although there is a stop light in this location.


Here is a look at a similar base on the northwest corner of Main St. There wouldn't be a gate on this side of the road (although it could certainly block the sidewalk).


Comparing the one at Main St. to the one at Elm St. there's a difference in the height of the post, with something attached to the Elm St. one.


Note that on the west side of Elm St., the manual gate is still present without any additional hardware.


Looking north, we can see the stoplight and the manual gate on the far side of the yard:


Clearly this isn't a standard installation.

As interesting as all this is, based on the 1955 Thomas Airviews aerial photos, the gates throughout my era remain the same. The gates on High and Washington St. in this photo are the old manual gates, and there aren't any flashing lights installed at these locations either. This is consistent at all streets in this series of photos.


So, despite the employee timetable, my assumption is that the crossings will retain the manual style gates through my entire modeling era. The gates will need to be "automatic." I need to be able to turn off the gates for manual operation in the earlier era, as the Employee Timetables note when the crews must stop and protect while the attendants are on lunch break.

How to build them? I have a couple of the Walthers ones to see if I can easily modify those to make them a little better. They just seem a bit chunky to me, but they are operational and easy enough to get.

Sunday, December 8, 2019

Return of the Son of Crossing Shanty

So building and installing the crossing shanties seemed simple enough. Until Main Street. For years I assumed the two-story one at Elm Street handled these gates as well, although I had no idea how they would be mechanically connected. But then I found this picture:


Sure enough, there's a shanty right behind the gate on the northeast side of main street. The date is unknown, but looks like the '30s or '40s. No problem, I can do that.


But in the Kent Cochrane video (c1952/3) it's on the southeast side of the tracks. It still looks like a small square shanty. Again, not a big deal, they moved it. So the question would be when.


In this post-1956 picture it's still on the southeast side of the tracks, and is clearly a simple square shanty.


And in a later picture ('60s?) when the arcade was demolished, is a good shot of the front. This structure will serve as the model for the "standard" crossing shanty I'll build for East Main St., and Stanley St. if I can fit it. Looking at it more closely, it's really rectangular in shape. Looking back at the Washington St. shanty, it looks a lot like it was the same size, then an addition was added on. I don't know if that's the case, but I'll use that as a starting point.

Here they are under construction:


The Washington St. one is on the top, and the two small ones will be for Main and East Main Streets. The size is based on a 30" wide door, and a 24" wide window, then just working the dimensions until they looked "right."

Note that in the Cochrane video, the electrical box isn't present yet. I'm guessing that was added shortly after the video for the automatic crossing gates.


Since it's not there steam era photos, such as in this c1947 shot by Kent Cochrane of an R-1-b on a winter day, I figured I'll make it moveable, placing it on the northeast side of the tracks for the 1948 and earlier sessions, and southeast for the '49 and later, at least until I find more specific information as to when it was moved.

And then I noticed this:

This is a crop of one of the 1955 Thomas Airviews, and the crossing shanty is on...the southwest side of Main St.? Huh?

That doesn't make sense, because we know it's on the southeast side after 1956 (because of pictures taken after the station is demolished). The Cochrane video is c1952/3. So why would it be on the other side of the tracks in 1955 between these two dates?

As noted, I can make it moveable, but I need to double-check the date of the Cochrane video. But based on the photos in the late steam era, I think it's probably still on the northwest corner in (at least most of) my era.

While I'm at it, I should probably get started on Embassy Diner...

Thursday, December 5, 2019

The Son of Crossing Shanty

After completing the two-story crossing shanty at Elm St, I decided I might as well work on the other ones that I'll need.

Washington and High Streets
On the layout, Washington St. and High St. become one and the same. I don't have the room for the additional block of Russell and Erwin, and as a result had to eliminate a runaround and a siding (although as I type this I can see the benefit for the runaround at that location and will have to see if maybe I can squeeze it in...). Anyway, I know there are crossing shanties at both locations, as can be seen in these aerial photos from Thomas Airviews taken in 1955:


Other than the aerial photos, I don't have any pictures of the High Street one, although it looks like a simple square shack. But I do have photos of three sides of the one on Washington St.:


The front, taken from a picture on a snowy day (and the first photo I had of the shanty).


The back, in the background of a photo taken from Main St. In this photo, the second block of Russell and Erwin buildings have been demolished for a parking lot. But it also demonstrates the view I will get on the layout, since the smoke stacks will be right next to Washington/High St. so even though I've eliminated the city block, the major structures will still be present, and in largely the correct location for photographs.


And this excellent photo of the side taken from Washington St. If this was the only picture I had, I would have assumed a simple square structure, without the compound roof that is evident in the other two photos. And while I can't build this scene exactly, I will build the factory buildings that are on the left behind the smokestacks, which will allow me to still build the two pedestrian bridges between the factory buildings.

Another aspect that I'm working on for this, and other scenes, is the fact that they not only have the manual gates still in use (thus the crossing shanties), but they are of an older style that are long enough to span the entire road. While Walthers makes manual gates like these, they are too short and too chunky.

Stanley Street
The only photo I have of Stanley Street is part of the same series of aerial photos:


It's also a helpful photo of Stanley Svea (the building still stands), and the surrounding area. You can see the elevated coal trestle on the far side of the building. This will be a simple square shack.

East Main Street
I don't have any photos, aerial or otherwise, of the East Main St. crossing. None of the maps I have note the location of a crossing shanty either, although my assumption is that there must be one. How to find out?

The Employee Timetable. Rule 1705 tells us what crossings have flashing light signals, and in New Britain in 1948 (the one I have handy), East St. and Wooster St. do, but not East Main St..

Rule 1707 tells us that the normal grade crossing whistle signal is not used in New Britain between Stanley and Curtis St., but that means it is used at East Main St.

Rule 1713. Public Crossings at Grade - Stop and Protect per Rule 898.
There are only two places within New Britain on the Highland Line where the train must stop and protect, Myrtle Street (which is a switching lead for Fafnir Bearings), and the Bonali private track at Wooster Street. Which means East Main St, must have a manned crossing shanty.

I don't know what it looks like, or what side of the street, so I'll make it a small square shack on the north side, since that's where I have space.

Berlin Line
I have pictures of two-story crossing shanties at Church St and Chestnut St.


This is taken from Elm St. and is from the series of photos in 1956 installing the Elm St. grade crossing.


This is a pair of photos looking East and West of Chestnut St c1920s (?). The Rogers Door and Sash building is still there, but the rest is largely gone. The flour, grain, feed (and poultry feeds looking east) sign is on the C. W. Lines grain silo. I was excited when I first learned of it, since I could have a grain silo, to find that it's just another brick building. In any event, it won't fit on the layout (it's in the middle of where the Berlin Line ducks under the helix).

I don't have any pictures of Park or Whiting Streets, nor do shanties show up in aerial photos, but the Whiting St. one is on the valuation maps. So I know the location (it will be on the lift up of course...), but not whether it is one or two stories. Because it's a wide open area, I might go with a single-story one, but all of the ones that I have pictures of on the Berlin Line are two story, so I might use one of those as the basis of the model.

Tuesday, December 3, 2019

Tank cars and Dangerous Cargo

Another interesting clinic in Chicago was about hazardous materials placards by Rich Mahaney. Tony Thompson has covered placards for my era, so no need to repeat it here. The placards and abbreviated instructions are also available on the Steam Era Freight Cars site.

But it did start me looking to see how it would apply to operations on the layout. And I found I have a booklet, conveniently dated May 15, 1947, to address those questions.


There are multiple sections based on job, and while some of the earlier sections might alter the paper work, the first I'll look at that will apply to operators on the layout is in Section VIII for Yardmasters, Yard Office, and Yard Crews:

10. Cars placarded Explosives" must never be handed next to the engine....either in switching operations or in trains. At least one non-placarded car must separate the engine from the "Explosives" car in switching operations.

22. Cars placarded "Explosives" must be placed and carried in trains, either standing or during transportation, as follows:
In all freight trains, when length of train permits, not nearer than the 16th care from the engine or occupied caboose; and when the length of train will not permit them to be so placed, as near as possible to the middle of the train.
...
Never next to an engine.
Never next to a loaded flat car.
Never next to an open-top car when any of the lading extends or protrudes above or beyond the ends or sides therof.
Next to a car equipped with automatic refrigeration of the gas-burning type.
Never to cars containing lighted heaters, stoves or lanterns.
Never next to a wooden under-frame car.
Never next to a car with live animals or fowl and occupied by an attendant.
Never next to a car placarded "Dangerous."
Never next to a car placarded "Poison Gas."
Never next to an occupied caboose.

23. Placarded loaded TANK CARS must be placed and carried in trains, either at rest or during transportation, as follows:
Not nearer the 6th car from an engine or occupied caboose, when length of train permits, but in no instance nearer than the second car unless the entire train consists of placarded tank cars.
Never next to a loaded flat car.
Never next to a car placarded "Explosives" or "Poison Gas."
Never next to a wooden under-frame car.
Never next to an open-top car when any of the lading extends or protrudes above or beyond the ends or sides therof.
Next to a car equipped with automatic refrigeration of the gas-burning type.
Never to cars containing lighted heaters, stoves or lanterns.
Never next to a car with live animals or fowl and occupied by an attendant.
Never next to an occupied caboose, except when train consists entirely of placarded tank cars.

24. A car placarded "Poison Gas" must not be placed...next to a car placarded "Explosives" or next to a car placarded "Dangerous." Any other position in a freight train is permissible unless the car is also placarded "Explosives."

26. Car placarded "Dangerous," other than tank cars, may be placed and carried in trains in any position desired except next to a car placarded "Explosives" or one placarded "Poison Gas."

Section IX Train and Engine Crews has the same rules, as e, f, g, and h.

All of these are rules that can easily be modeled in our own operations.

Thursday, November 28, 2019

Crossing Shanty Part V

Happy Thanksgiving!

As promised, I'll actually finish this model. Well, except perhaps for some weathering.

Anyway, next up was the roof. I started by measuring 3 scale feet up the roof with my HO scale caliper.


This gave me a line to work with. I used paper medical tape for the roofing material, we always have a lot on hand for our daughter, Emily.


I put the tape a little above the line so there will be some overlap. I marked it along the corner with pencil, then cut along those lines. I left it long so I could trim it after it was attached to the roof. I used Aleene's full strength so I wouldn't have to rely only on the stick of the tape.


I used the same basic process for the peak of the roof.


I then measured out strips for covering the corners.


I painted the roof with a spray can of Rustoleum Flat Black Primer, and hand painted the stack with Citadel Chainmail, which is essentially a black/silver mix.

I then made the storage box from .060" styrene, and covered it with 2"x6" boards and painted with the same Tamiya Dark Earth as the tower. I actually made it too tall, so I used another Dick Otto technique and sanded off 6" with 60-grit sandpaper.


Crossing Shanty Part IV

So one of the things I'm notorious for is not finishing projects. At least in a timely manner. The process of building the shanty so far has taken me two days to the end of Part III. These posts are also written well ahead of the time they are scheduled to be posted on the site, since I can write a bunch of posts at one time.

My intention was to complete this model fully, painted and weathered. When I finished the Part III process, I needed some supplies. When picking up the strip styrene, I tripped in the dark parking lot, and thought I had broken my leg/ankle. It turned out to be a very bad sprain. Since stairs are tough, I wrote out these posts the next day, which aren't being published on the blog for a few weeks. Thus giving me time to finish the build process and finish Part IV. So here we go!

The techniques for the rest of the build are basically the same.


The railings are made from 2"x4" strip styrene. In the pictures, the only support I can make out is the one diagonal brace. I may add a second to the other side, but I can't see any legs.

The windows themselves are a mix of 1"x3" and 1"x2" pieces. I started with the bottom of each window, then the top, sides, and finally the mullions.

The side window is open, as in the picture. I haven't added the top of the lower windows yet, because I need to add clear styrene to the upper window first, after painting everything.


The front window looks like it is three separate windows, and I couldn't tell if they could open or were fixed, so I opted for fixed. I created the posts by using three strips of 1"x3" with the center one sticking out slightly. Once those were in place, I built the frame of the window itself in the same way as the others, so those center posts end up as 5 layers of 1"x3" with the center protruding the furthest. On either side, each successive piece is back just a little bit more to give it the proper "stepped" appearance.

The horizontal mullions are glued to the edge of the actual window frame. I did the outer mullions first, so I could line them up with the clapboard siding, then the center ones, to keep them as level as I could.


I started the door with a square of .010" styrene for the lower part, and used 1"x6" strips for the raised portions. The top was created using the same approach as the other windows, using 1"x3" strips.

I painted the entire exterior with Tamiya AS-22 Dark Earth in a rattle can. The only color photo I have is a frame of a Kent Cochrane video, but it looks like it's just some shade of dark brown, including the trim. It's possible that it's a bit of a gold color with darker brown trim, but I can alter that with weathering if I choose. The same applies to the weathered platform and stairs.


The interior is painted by hand using Vallejo 70.644 Sand Primer from their Mecha line. I have no idea what the color should be, nor what sort of interior I'll eventually add.

Once painted, I added window glazing. The only tricky part was the open window. The upper glazing had to fit perfectly within the window frame. Then I added the painted 1"x3" for the top frame of the lower window, and the glazing behind that. The glazing is glued into place by Aleene's as usual. I'm out of Canopy Glue, but best I can tell that's a thinned PVA glue in that it dries clear and remains somewhat flexible. In any event, the Aleene's works just fine.


Next post, final touches...