Showing posts with label Scenery. Show all posts

Wednesday, February 9, 2022

Revisiting my Ballasting

I originally ballasted and scenicked the area around the west side of town and the yard based on photos like these:


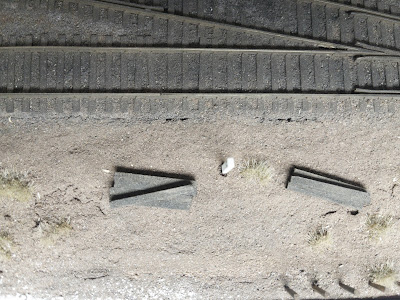

The ballast is the stone (basalt) that I expect, a relatively dark gray. The ground around it is lighter and looks like dirt.


The thing that bothered me about this, is that dirt turns into mud very easily and isn't typically a good choice in a yard, or immediately around the tracks. I know there are plenty of areas where this is appropriate, but it didn't seem like the yard and running through New Britain is one of them.

But color photos, even those from a few years later, tell the true story. It wasn't dirt, but cinders. In fact, I had expected this, but since the ground was lighter than the stone ballast in the black and white photos, I thought it was just dirt.


For some time, I've been debating what I think I should do (if anything) regarding the ballasting and ground cover I had done before.

I had some more recent posts here and here regarding ongoing experimentation with ballasting. The problem is, they look quite different (and better) than what I had done earlier.

In an unrelated project, I wanted to adjust the width of Main St. and Elm St. In the process, one of the tracks popped up due to contraction once freed from the Main St. crossing:
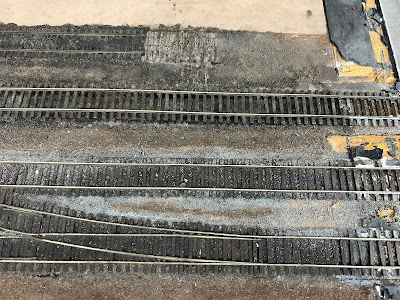

Since I had to clean the ballast from around that track, I started cleaning some more. (You can still see the white film on the base that has been occurring when I tried using grout on my layout.)

In the end, I have removed all of the ballast and most of the ground cover from west of Main St. I will most likely do the same for New Britain Yard, but not until I am sure that I have finalized my ballasting process.

As good as the last few experiments went, they still weren't quite there. So here are some new ones:


These results are much, much closer to what I'm trying to achieve. I'm also working through many options for weathering the ties and rail, since I think the colors and textures all have to work together, from the ground cover to the rails.

I'm still working on the cinders. What I have is too large and/or too dark, but I'm getting closer.

The biggest key to the new look above is a blend of multiple sizes of ballast. Most of it is the primary size I've been using, but there is some of one size smaller and one size larger mixed in. I've also included some ballast tinted brown, which doesn't come through on the photos as much as it does in person, plus some cinders.


I will provide further details once I dial in the cinders mix and the coloring approach for the ties and rail. I have trackwork and wiring to do first.

Monday, October 4, 2021

Asphalt

One of the things I need to finish (once I get the track completed again), are the roads. I experimented a bit with AK Interactive's asphalt which I really like, but the texture is a bit too large for HO scale.


I tried sanding it down to see if that helps, and it's a bit better, but I was still looking.


I then found some craft paints at Michael's that are lightly textured. It's very subtle (and perhaps more noticeable in person). I tried four colors, and various degrees of blending and dry brushing on a piece of cardboard:


Here's a bit on the layout, as a base coat:


I really like the light texture. These are thick acrylics, I may want to thin them to cover more surface area. Now to find some reference photos to see if I can match the coloration.

Tuesday, September 1, 2020

What else am I working on? Ballast as usual...

On a recent trip to Plainville I was there at just the right time to catch the Pan Am train on the old Highland Line:


I decided to head to Forestville to see if I could catch it there. I didn't, because it parked a little before it got there for some reason. However, thinking about it this would be the train that would interchange cars in Plainville, not work the industries on the Highland and lower Canal Line. So for whatever reason they just weren't ready to do their work. They would be on the other end of the train if they were done, to head back to the Springfield Line in Berlin. As it turns out, Jess and I saw a much longer one a a couple of days later sitting at Cook's Quarry on the border of New Britain and Plainville. It was also just waiting there at the time. Being a single-train, single track main it's odd that it was waiting there. If it needed clearance for the Springfield Line I would expect it to be waiting right at the wye.

In any event, in Forestville I was looking at a stretch of track and took a few pictures for reference for ballasting:


I took a closer look at the darker material and found flecks of coal. It's actual cinder ballast!


So I looked around and found a discarded bucket and brought some home:

Here are a couple of experiments with it after I sifted it:


And another section just between the rails with a bit of a different mix:


In addition to trying to develop a mix for cinders and dirt I like, I also think I need to mix some different sizes for a less uniform look than my earlier experiments. Especially along the edge where the maintained stone ballast meets cinders and dirt. Another issue is combating the fact that the material darkens when glued, which tends to make cinders by themselves too dark.

Another thing I'll work on adding are dried leaves in some areas, since I'm modeling early November. 

A little later I also stopped by Tilcon to replenish my supply of stone ballast. The process is simple. I got a set of 5 stacking screens, with 120, 130, 150, 170, and 1100 holes per inch. They fit a standard 5-gallon bucket. You put the one with the smallest holes (1100) on the bottom, and progressively larger holes on top of that. I put a small shovel full of material in the top one, then shake the bucket to screen the material. As I fill containers, I label them with the two screens, such as 130/150, meaning the material passed through the 130 screen, but not the 150.

Here's the set up at Tilcon:


At Tilcon, you drive in and weigh your vehicle. I then go to the screenings, and start sifting. I spent about an hour today, and refilled my supply pretty well.

The cost?


$1.41 for 5 sizes of material. The screenings that go through the 1100 screen is basically dust and is fantastic for dirt and cinders in HO. For ballast my primary size is the 130/150. For some reason the size that is always the least that I get is 170/1100, but I don't seem to need much of that either. 

Saturday, March 14, 2020

It's all in the details

So this is an interesting little detail that I can easily add to the layout and I didn't know existed.

In the September 1945 issue of Along the Line, the New Haven Railroad employee magazine, there's a one page quiz ("What Do You Know?") with about a half-dozen pictures of railroad items to see what you know. All were pretty easy for somebody with some knowledge of a railroad.

But this one was interesting and useful:

I already knew what New Haven mile markers looked like (although it is possible that there are other options, since the NH was made up of so many predecessor roads and there are differences on each line). The same applies to speed limit signs. But I wasn't entirely sure about the other two options.

I guessed correctly, and now I have another prototype detail that I can add that will also assist my operators - it's indicating how many cars the siding will hold to that point. It's such a simple detail to add but will be extremely helpful to the crews when working Track #5 which is where I'll use these signs.

While I don't have any more details as to how these were used, I'll use it on Track #5 between streets. For example, the number of cars from the start of Track #5 to East Main St, and then the number from East Main St.to Elm St. It will be particularly helpful at the start of Track #5, because I can also use it to mark the start of where a car can be safely left without risking it rolling down the grade into the helix.

Unfortunately, this appears to be the only issue that had this sort of quiz.

Thursday, December 19, 2019

Tweaking the Process - Ballast

So this started because I wanted to try the Chooch cut stone retaining wall for along where Track #5 has to be elevated as the helix is declining so we can leave cars there.

When picking up supplies at Roger's, I noticed the Woodland Scenics Shaper Sheet, which ended up being different than I expected. It's a stiff foil sheet with some sort of felt/fabric material on top. It's intended to be used with plaster cloth, and binds to the plaster. But I wondered if I could use it in this location and put it under the track too, which covers the slots in the Woodland Scenics risers I used to keep the track level. 

So I glued down a scrap of track and ballasted it using the ballast I sifted at Tilcon in Plainville, from the same area that the New Haven got ballast from Cook's Quarry, and some dirt from New Britain.


It worked OK, although there were a lot of fibers that stick up through the ballast, and I decided to skip using it under the track. Except in one location where there wasn't any foam support, so I wouldn't need to use so much ballasting material to bring it up to level.


At this point, it was worth seeing how the ballast would look.


Which led me to realize that I hadn't painted the track first like I usually do so I used a Paint Pen for the initial layer of color, before the usual Pan Pastel weathering, and used the same technique on the wall.


Of course, now I wanted to see how the lower track and ballasting would look...


I need to add a cap to the stone wall.

The process is coming together nicely, and finally seems to be fairly repeatable.

For the rest of the area I went back to spraying all of the track with the Rustoleum Camouflage paint (only to find that it melts the Woodland Scenics Risers, but not enough that I had to take anything up).

I then add a thin layer of ballast, just enough to cover the area, and wet that with Future. I then sprinkle additional ballast on top of that, enough so the Future doesn't soak through. Once dry, I remove the loose ballast, then wet the area with Future and repeat with the same approach. This builds up the ballast in layers, but the top layer isn't saturated in the Future (or other glue) so it isn't darkened or have a film over it.

I use a very small pipette to apply the Future, and primarily rely on capillary action to draw it between the ties. Where I need to, it's narrow enough that I can drip future between the ties without getting it on top of the ties. If I do it's not a big deal. The goal is to avoid having a glue film on top of the ties or the ballast.

For the ballast on top of the ties, I use the paint pen to color the tie (which also works to cover any locations the Future did get on top of the ties), then sprinkle a few pieces of ballast here and there. Once that is dry, I use a Raw Umber Shade or Extra Dark Pan Pastels for the ties, then a Neutral Gray in places to lighten them up. In my era, it looks like the majority of tracks are well maintained and the ties are not a faded silver-gray like they are today.

For the rails, I used the Paint Pen (Woodland Scenics Railroad Tie Brown, if I recall, but the color is really irrelevant because the Pan Pastels provides all of the color) to wet the rails, then after letting dry slightly, I used Raw Umber Pan Pastels to first stipple (so it won't wipe off too much paint), and then "paint" the rails by sliding the brush down the rails to smooth out the look.

I then use the Raw Umber Extra Dark and Black to darken the entire area between the rails. All of this should be somewhat random yet consistent.

I'm very happy with the way this came out, compared to my earlier efforts (which means half the layout is going to look much better to my eye). 

The stonework used the same technique in wetting with the Paint Pen, then a variety of Pan Pastel browns, blacks, and grays. 

I've considered not using the Rustoleum, since the color really isn't going to show through after the later coloring. But I find that it gives a little more tooth to add the additional layers of paint and weathering.

Here's the wider area in progress. This is after another layer of ballast, before brushing and/or vacuuming the excess.


If you start with a clean vacuum you can reclaim your ballast if cost is an issue. For me it's a question of time, not money. The sifting screens cost less than $70, and my ballast costs me less than $20.00/ton. So I highly recommend sifting your own if you can. 

While it seems like this takes a long time, I tend to work in small sections. I can do a layer of stuff over a foot or two in about 10-15 minutes, then move on to other things while it dries. I have additional work to do before I'm ready to do this whole area (primarily figuring out what to do with the backdrop), but I'd like to do this scene because it leads into the layout and is just scenic. 

Tuesday, December 10, 2019

Crossing Gates

As an addendum to the Crossing Shanties series, I'll need to look at how to model the evolution of the crossing gates in New Britain.

The line from Smalley Street to Curtis Street (the entire layout) received new automatic gates flashing lights in Summer 1952. The Employee Timetables note where they are in use, and in April of 1952 only East St. and Wooster St. had them (and had since before 1946), but by October '52 the entire line does.

In the photos I posted for the Main St. crossing shanty, there is no signal box in the Cochrane video, but in the later photos one has been added. Presumably for the crossing gates.

But what's interesting is that the Elm St. and Main St. installations aren't your typical crossing gates. In this shot looking south on Elm St in 1956, the manual gates are still present, and what looks like the base of a typical automatic crossing gate. There are no flashing lights, although there is a stop light in this location.


Here is a look at a similar base on the northwest corner of Main St. There wouldn't be a gate on this side of the road (although it could certainly block the sidewalk).


Comparing the one at Main St. to the one at Elm St. there's a difference in the height of the post, with something attached to the Elm St. one.


Note that on the west side of Elm St., the manual gate is still present without any additional hardware.


Looking north, we can see the stoplight and the manual gate on the far side of the yard:


Clearly this isn't a standard installation.

As interesting as all this is, based on the 1955 Thomas Airviews aerial photos, the gates throughout my era remain the same. The gates on High and Washington St. in this photo are the old manual gates, and there aren't any flashing lights installed at these locations either. This is consistent at all streets in this series of photos.


So, despite the employee timetable, my assumption is that the crossings will retain the manual style gates through my entire modeling era. The gates will need to be "automatic." I need to be able to turn off the gates for manual operation in the earlier era, as the Employee Timetables note when the crews must stop and protect while the attendants are on lunch break.

How to build them? I have a couple of the Walthers ones to see if I can easily modify those to make them a little better. They just seem a bit chunky to me, but they are operational and easy enough to get.