I stopped by the local Blick's for some supplies and picked up a tube of Winton Burnt Umber oil paint since I've never used oil paints before. Wow, what a pleasure to work with.
Because they are so slow in drying, you can continue to make adjustments for hours (literally). Too heavy? A bit of mineral spirits and you can brush it off. It lets you work over a wider area to ensure that you like the way it looks as a whole.
The pictures themselves only tell a very small part of the story - that I like the final results I can get.
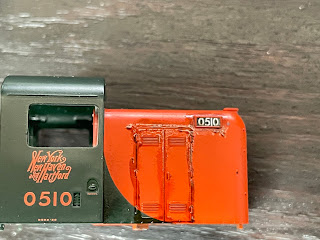
I painted over this entire side with un-thinned paint, then wiped it off with a paper towel to fill in the lines and also leave a slight layer of "dirt" on the entire side. You can see the un-weathered section to the left for comparison.
I also used a slightly damp brush from top to bottom to spread the dirt.
I did a lot of experimenting along the side sill. Mostly to get a feel for working with the medium. While the finished result isn't all that different from this post, or this one, it was the process that was different. Because I could rework it I had a lot more control over where the paint would go. I had started very heavy, then brought it way down.
This is with a (very) light dusting of Vallejo pigments. So the pictures show that I can get similar results with these as I have with acrylics (no real surprise there, as it's still just using paints).
These aren't intended to be finished, I just wanted to see how working with oils really was (for some reason it seemed intimidating to me or for "advanced" modelers only). The reality is, its the most forgiving approach I've used to date. It won't be the only technique I use, but I can see myself using it on most weathering jobs.
Especially where I'll be adding details using only paint. It's easy to use an acrylic or enamel filter to dirty up the side, or a wash to add the dirt around rivets or in the crevices, etc. I did like the way this flowed in that process, and the ease of removing it when not happy with the results. But for details like rust spots on a car side for example, where you aren't using a physical aspect of the model as a guide for the paint, using oils lets you experiment without any concern because if it doesn't come out how you like it, you can remove it entirely - hours later.
When weathering the flat car decks and the RS-2, the process was largely "random." Using washes, filters, drybrushing and some blending. But the finished weathering is directed, but imprecise, taking advantage of the way the paint flows around the details, things like the way water as a thinner causes the paint to dry in different ways than a flow improver or solvent, etc.
But there have been times, like the RS-2, where that approach wasn't entirely satisfactory to me. Where I'd like to be able to precisely paint what I'd like. And also remove what I don't like. Although that can be done with any type of paint, the removal process is much harder with acrylics because they dry very quickly.
Since I have an extra RS-2 cab, I did some more experimentation. Note that the paint I'm using on my palette is the same that I started with yesterday. It's still workable.
Here's a heavy application. Something that would be tricky with acrylics or even enamels.
Using mineral spirits to spread and thin it more into a filter.
Another view. Very streaky at this point.
After more working, particularly with a dry brush that is removing and blending the color.
I also used a paper towel to stipple the color while removing it.
I wanted more around the louvres and doors, so adding more.
Then using the dry brush to shape, remove, and blend.
This looks much closer to what I was trying to achieve on the completed models. The photos in my era show the RS-2s are quite clean, so I just wanted some subtle emphasis around the doors and rivets, and where dirt might collect. Definitely an approach I will be using for weathering locomotives in the future.
I did the other side with Tamiya Panel Line Accent Color (Dark Gray).
The effect was good, especially between the doors and on the louvers. It was much harder to control, otherwise, since it's a wash. A mix of techniques and mediums seems to be best, which isn't a surprise.
For reference, here's what my completed RS-2 looks like - and the effect is a bit heavier in person than in photos:
I certainly wouldn't consider it "bad" weathering. Especially for the first locomotive that I've ever weathered. But I think I definitely could have done better if I had used oils at the time. I also hadn't discovered how differently the washes/filters work with tap water (which is what I used) and other thinning options. So it's always a learning process, and I highly recommend learning new techniques and using new materials, just so you have more options to find the best approach for a specific project.


WOW, that's amazing!!
ReplyDeleteThanks for sharing.
Saludos
Excellent - and definitely something I’ll be trying out. Thanks for taking us through the process and sharing what you learned!
ReplyDeleteHope it works well for you!
ReplyDelete